Navigation Links

  • Home
  • How to build
    your own
    Water Rocket
    • Water Rocket Tutorial Index
    • Water Rocket Construction
      • Parachute

        A strong and reliable parachute design is very important to anyone wishing to develop a water rocket with a recovery system. Any system from a simple Air Flap mechanism to the sophisticated ServoChron™ electronic deploy system relies on a well made parachute. This tutorial will reveal the secrets to easily making a parachute that will safely recover your water rockets.

      • Bottle Coupler

        This tutorial will show a method for creating inter-bottle connectors which can be used to join together multiple bottles by the threaded necks. These bottle connectors are useful for Water Rockets because they allow for a modular approach to be applied to your rocket design, which simplifies construction and repair of a damaged rocket.

      • Bottle Cutting

        Nearly every water rocket design that you can construct will involve some sort of bottle cutting. This tutorial will show you an easy method for getting perfect cuts every time.

      • Constructing Removable Box Fins

        One set of Water Rocket components which are critical to a successful and stable flight are the fins. U.S. Water Rockets designed and tested a new idea for creating water rocket fins which is called the "Box Fin" design, to create a quick and easy method for adding fins to Water Rockets which were much more rugged than typical fins, yet easier to fabricate with a higher degree of accuracy. This tutorial will explain how to create a triple box fin for a water rocket.

      • Enhancing Removable Box Fins

        The first improvement we will make is to modify the fin design so that it is adjustable to fit multiple bottle diameters. The next improvement we will make is to alter the attachment method for the fins. If you fly in an area prone to landing in trees, you can modify the design so that it will break away from the rocket with less force.

      • Nosecone

        One of the most important components you will build for your water rocket is the nosecone. This tutorial will explain how to build a good looking nosecone that performs great too.

      • Corriflute Recycling

        A relatively new building material used in the construction of water rockets is a corrugated plastic sheet or corriboard. It is also known under the tradenames of Corriflute, Coroplast, IntePro, Correx, Twinplast, or Corflute. This tutorial explains how to repurpose used corriflute for your water rockets.

      • Bottle Label Removal

        This tutorial will show you how to prepare your bottles for Water Rocket Construction. To prepare your bottles, the labels and glue must be removed, and the bottles must be cleaned of all contamination from their contents and oils left from manufacturing or handling.

      • Bottle Label Removal V2

        This tutorial will show you another method how to prepare your bottles for Water Rocket Constrction. This involves removing the labels and adhesive from the bottles and making sure there are no oils on the bottle. Failing to do so can result in the rocket leaking or exploding under pressure, due to contaminated splices.

    • Launchers
      • Cable Tie Launcher

        What good is building a water rocket if you have no way to launch it? The launcher we will be constructing is a variation of the Clark Cable Tie launcher, as this is the most reliable launcher that is easy to make.

      • Launch Tube o-ring

        Revised instructions for adding the o-ring to the Clark Cable Tie Launcher launch tube which simplify the build and improve the design. We have put a lot of effort into simplifying the design to remove steps which involve precise measurements and part placement, to maximize the ease of construction.

      • Cable Tie Release Mechanism

        This tutorial shows how to add a Clark Cable Tie Release Mechanism to the 22mm Launch Tube fabricated in the previous tutorial. This tutorial shows the newly revised and simplified instructions for making the release.

      • Split Collar Launcher

        This tutorial shows how to create the latest type of water rocket launcher which uses the newest improvements.

      • Gardena Launcher

        This quick tutorial showing how to make a compatible water rocket launcher that uses a gardena hose quick release connector for the release mechanism. This type of launcher also works with any standard gardena nozzle in addition to our 3D printed nozzle design. If you have all the materials on hand you should be able to build this launcher in an hour or less and be out launching water rockets in no time!

    • Parachute Deployment Mechanisms
      • ServoChron™ Quick Start Guide

        The ServoChron™ is a low cost time delayed dual servo controller designed for use as a parachute deployment or staging mechanism for Water Rockets. There are other potential applications for the ServoChron™ as well. The core of the ServoChron™ is the Texas Instruments MSP430 LaunchPad. This $4.30US board is an inexpensive microcontroller hobbyist experimenting platform that you load our FREE application firmware into with a USB cable. The FREE ServoChron™ application firmware file created by U.S. Water Rockets turns the MSP430 LaunchPad into a user programmable dual servo deployment system timer/controller.

      • Launch Detect Switch

        This tutorial will show you have to construct a very reliable and lightweight acceleration switch which you can use to activate electronic systems on your rocket such as a ServoChron™ 2 Dual Servo Actuated Parachute Recovery System.

      • Parachute

        A strong and reliable parachute design is very important to anyone wishing to develop a water rocket with a recovery system. Any system from a simple Air Flap mechanism to the sophisticated ServoChron™ electronic deploy system relies on a well made parachute. This tutorial will reveal the secrets to easily making a parachute that will safely recover your water rockets.

      • Radial Deploy System

        Since it is the key to safely recovering a rocket and payload and all the time, materials, and labor that went into building them To insure the safe recovery of our fragile and expensive experiments and payloads, we decided that we needed to invent a parachute system that was more reliable than anything ever flown before. We dubbed this new design the "USWR Radial Parachute Deployment System", and it is a radical departure from traditional systems, because it relies on only one moving part. The system we designed met that goal and also has a number of other advantages over previous systems.This system is less expensive and time conuming to build, has less moving parts, and can be located more places on your rocket.

      • Axial Deploy

        The objective of this tutorial is to demonstrate how to build a completely new type of parachute recovery system for water rockets. This system was developed to fill the need for a reliable parachute recovery system that could be made from common materials which was very easy and fast to make. Historically, ease of assembly and reliability have been mutually exclusive goals. This prompted U.S. Water Rockets to take a "clean slate" approach to the problem. This tutorial will explain how to construct the latest version of the U.S. Water Rockets Axial Parachute Recovery System.

      • Hybrid Deploy

        The Hybrid Deploy System is our latest idea for improving water rocket systems to make them more reliable and easier to build. This system improves upon our previously published designs known as the Axial Deploy System, and Radial Deploy System. By combining the ease of construction of the Radial Deploy System, with the heavy duty capacity of the Axial Deploy System.

      • Launch Detect Switch

        This tutorial will show you have to construct a very reliable and lightweight acceleration switch which you can use to activate electronic systems on your rocket such as a ServoChron™ Single/Dual Servo Actuated Parachute Recovery System.

    • Splicing
      • Bottle Splicing

        In order to create larger Water Rockets with bigger pressure chambers than afforded by typical soft drink bottles, many enthusiasts have resorted to joining multiple bottles together using various methods which all are commonly referred to as "splicing". This tutorial will show you how to use this new method to create perfect splices that are easier to create and outperform traditional splices in both strength and appearance.

      • Bottle Label Removal

        This tutorial will show you how to prepare your bottles for Water Rocket Construction. To prepare your bottles, the labels and glue must be removed, and the bottles must be cleaned of all contamination from their contents and oils left from manufacturing or handling.

      • Bottle Cutting

        Nearly every water rocket design that you can construct will involve some sort of bottle cutting. This tutorial will show you an easy method for getting perfect cuts every time.

      • Tornado Tube Coupler

        Many teams build their rockets in this manner using a pre-manufactured commercial product used in school science experiments commonly called a "Tornado Tube" or a "Vortex Bottle Connector". The commercial versions typically cost $1.00US to $2.00US each. This tutorial will show how to make them for pennies each and without the expense and time consuming process of turning them on a lathe. This method could also be applied to other size bottles such as the wide mouth bottles that sports drinks often are supplied in. These bottle connectors are useful for Water Rockets because they allow for a modular approach to be applied to your rocket design.

    • Creating Panoramas

      This tutorial explains how to create a panoramic view using some free image stitching software which you may already have on your computer and were not even aware of!

    • Tree Recovery System

      If you have hobbies which involve things that fly such as RC Planes, Drones or Model Rockets, then chances are that you've had one which you were flying end up stuck in a tree. We've had this experience a number of times in the past, and we wanted to share our Tree Recovery System with you so that you may benefit from our design. In this Tutorial we will show you how to build and how to use our design, which is easy and inexpensive to make and works amazingly well.

  • World Records
    • World Record Index
    • 2004
      • September 2, 2004 1,421 feet

        On September 2, 2004 U.S. Water Rockets set a new single stage water rocket altitude record with an average altitude of 1,421 feet, beating the old record of 1,242 feet that was held by Anti-Gravity Research.

      • September 6, 2004 1,471 feet

        Just 4 days after setting the water rocket single stage world record, it was raised to 1,471 feet.

      • September 11, 2004 1,481 feet

        After 4 more days X-10 set a new water rocket altitude record of 1,481 feet

      • October 23, 2004 1,606 feet

        On a beautiful fall day with the autumn foliage in full glory, the water rocket altitude was raised to 1,606 feet (stunning autumn foliage can be seen in the onboard videos).

    • 2005
      • April 16, 2005 1,609 feet

        On the first launch day of 2005 a new single stage water rocket altitude record was achieved. The required two flights averaged at 1609 feet.

      • May 26, 2005 1,696 feet

        This record was described on the television show Mythbusters.

      • September 24, 2005 1,715 feet

        The shakedown flights for the new X-12 water rocket proved to be winners with a new world record of 1,715 feet.

    • 2006
      • April 29, 2006 1,787 feet

        The freshly rebuilt X-12 water rocket sets a new world record after nearly being destroyed in an October 2005 crash during a record attempt.

      • April 30, 2006 1,818 feet

        After setting a record the day before, the weather conditions were conducive to another record attempt. A new record of 1,818 feet was achieved as the 2 flight average.

      • May 8, 2006 1,909 feet

        On May 8th 2006, a new WRA2 water rocket single stage world record was set by the famous X-12 water rocket.

    • 2007
      • June 14, 2007 2,044 feet

        X-12 pushes the official water rocket single stage world record to over 2,000 feet with an average of 2,044 feet.

  • Launch Reports
    • Launch Reports Index
    • 2004
      • 8-22-2004
        X-10 Crashes

        X-10 Water Rocket crashes and results in the total loss of a video camera and altimeter earlier today during a shakedown flight of a Water Rocket designed to set the World Record for Altitude. The launch went perfectly, but when the rocket went through apogee at nearly 1,200 feet it deployed a parachute which somehow separated from the rocket.

      • 9-12-2004
        Tree Recovery

        A recovery crew for U.S. Water Rockets successfully retrieved the World Record Holding X-10 Water Rocket from a precarious position in a tree, where it had been lodged for 3 weeks. This flight insured the development of our tracking and telemetry system.

      • 11-23-2004
        HD Camera Test

        The successful construction & testing of the remarkable new C-7 payload bay, the first ever payload section to loft a High Definition Water Rocket Video Camera

      • 11-27-2004
        HD Camera Test II

        C-7 is the highest resolution Movie Camera to ever fly aboard a Water Rocket, and was designed to outperform its predecessor, C-6 in resolution and framerate. In the second round of test flights, C-7 performed spectacularly, producing very smooth clear video with every test.

    • 2005
      • 6-5-2005
        Rapid Deploy Parachute

        The latest round of test flights which allowed ground observers to view and photograph a new design parachute in action. The entire deployment process was easily visible with binoculars from the ground, making the performance of the new system easy to evaluate. As a backup, in case the ground observations failed to produce conclusive performance data, we installed an innovative "ChuteCam" system in place of the WRA2 required Apogee camera. The ChuteCam uses a series of prisms to bend light and give the ChuteCam a reverse angle view, perfect for observing the parachute unfurling behind the rocket after deploy.

      • 10-29-2005
        Crash from 1,819 Feet

        While attempting to set a new WRA2 record altitude, parachute failure dooms X-12 and inspires herculean data recovery effort to recover the video from the destroyed camera.

    • 2006
      • 6-6-2006
        2,001 Feet

        Although not an official record due to a second flight did not occur due to lack of daylight, X-12 becomes the first Water Rocket ever to surpass 2,000 feet.

      • 7-19-2006
        2,088 Feet

        X-12 reaches an unprecedented altitude of 2,088 feet (636 m) on a clear summer afternoon with great visibility and bright sunshine. Unfortunately, when the rocket was recovered the water tight bulkhead seals of the payload section appeared to have cracked under the tremendous acceleration of launch and allowed water to fill the electronics bay upon splashdown.

    • 2008
      • 12-26-2008
        Project 3000

        Launch Report of our X-12 Carbon Fiber High Pressure Water Rocket conducted to test our new HD camera and electronics payload during freezing cold weather conditions which resulted in a near disaster when the parachute failed, only to be saved at the last second by a tree.

    • 2011
      • 11-25-2011
        7 Cameras

        Our B-2 Water Rocket was test flown with an unofficial word record of 7 onboard cameras in order to record video of a test of some enhancements to our free ServoChron Servo Deploy Timer Software, and our newly invented Axial Parachute Deploy Recovery Ejection System. This Launch Report contains the details of the launch and the results of the flight, including failure analysis and data logs.

    • 2016
  • Research & Development
    • Research & Development Index
    • Deployment
      Systems
      • Dual Deployment System

        The dual deploy system proved to be a resounding success and a quantum leap in safety. If either one or even both of the parachutes became tangled or failed to inflate, the separate rocket sections would be too unstable to fall ballistically to the ground. Instead, the sections would tumble slowly down, reducing the chance for injury or property damage on the ground due to a "lawn dart".

    • Launch
      Systems
      • Split Collar Launcher

        Water Rocket launcher mechanisms are an important area of Water Rocket design which has received almost no attention by researchers for more than a decade. This Research and Development article introduces our completely new launcher design to the water rocket community, and the history of the evolution of this radical new design.

    • Tracking & Telemetry Systems
      • Ground Test

        A rocketeers worst nightmare is a lost rocket, to combat this we designed our own telemetry and tracking system. A ground test of our new telemetry and tracking system

      • Live Test

        A live test of the tracking system proved a range of 50,000 feet.

    • Tools
      • Bottle Cutting Tool

        The bottle cutting jig will cut a straight cut around your bottles to remove the bottom or neck when splicing or making nosecones.

    • Pressure Tests
      • Compressor Failure

        To construct a world record water rocket, we needed to do many pressure tests. On this test the compressor failed and caught fire. Then the test vessel self launched at 300PSI!

      • Thermal Imaging
        Pressure Test

        Does a water bottle rocket explode because the plastic bottle heats and softens when the air inside is expanding and stretching the plastic? We wanted to find out. The purpose of this experiment is to determine if bottle burst pressure is reduced because of the heat generated by the stretching bottle as it expands.

    • Chase Camera

      As early as 2003, we were experimenting with ways to get outside views of our water rocket. Back then we had been flying a camera inside a payload compartment that was meant to separate from the pressure vessel at apogee. This article shows the development of a new system which would record the entire rocket for the entire flight, rather than just the descent of the pressure vessel.

    • 3D Camera

      At that time, basic ordinary video cameras capable of shooting 3D were quite costly (and they never came down in price since 3D never caught on in a big way). Therefore, we decided the only way to accomplish what we wanted was to build a 3D Camera Rig that would allow us to use our specialized cameras to achieve the goal. The way to accomplished this is to somehow use two similar cameras in tandem to capture photos and videos for each eye, and then merge them in software to create 3D output.

    • Tower Camera

      We wondered what the view would be like to a person standing on the tip of a Water Rocket as it was launched hundreds of feet into the air, so we came up with an idea to make a tower to mount a camera on the top of a Water Rocket, so we could find out what it would look like from that point of view.

  • MSP430 Launchpad Projects &
    Utilities
    • MSP430 LaunchPad Index
    • Projects
      • Replace Male Headers

        This tutorial will show a clever trick which will make it extremely easy for anyone of any skill level to remove the male headers that are installed on the MSP430 LaunchPad without damaging the circuit board, and replace them with the female headers provided.

      • Horizontal Stabilizer

        This tutorial shows how to modify your MSP430 LaunchPad so that you can use it with both Breadboards, and BoosterPacks. This simple modification is very easy and costs almost nothing. You can have the best of both worlds by adding these "Horizontal Stabioizers" to your MSP430 LaunchPad.

      • Ruggedizing the LaunchPad

        This tutorial shows how to modify your MSP430 LaunchPad so that the removable jumpers will not come loose if your MSP430 LaunchPad is subjected to high accelerartion or vibration forces. This simple modification is very easy and costs almost nothing.

    • MSP430 Drivers
      • MSP430 LaunchPad Drivers

        This archive contains the MSP430 Application UART driver file necessary to communicate to the UART on the MSP430 Launchpad. MSP430 projects which communicate to the PC will use this driver.

    • ServoChron™
      • ServoChron™ Manual

        The ServoChron™ is a low cost time delayed single/dual servo controller designed for use as a parachute deployment or staging actuator mechanism for Water Rockets, or Water Rocket Propelled Vehicles. There are other potential applications for the ServoChron™, but this document focuses on the Water Rocket single/dual parachute deploy application. The ServoChron™ was created specifically to make servo controlled recovery and staging mechanisms easy to build, and affordable or everyone. Note: this manual includes the ServoChron assembly, programming and operating manuals into one convenient file. This manual supersedes the previous revisions.

      • ServoChron™ Firmware

        ServoChron™ Firmware file archive for the MSP430 Launchpad.

  • 3d Printing
    • 3d Printing Index
    • Gardena Nozzle

      A type of Water Rocket launcher that has been popular for well over a decade uses a garden hose quick release connector for the launcher mechanism. These connectors are often called Gardena connectors because of a popular brand of connector that these launchers and nozzles were made from. We used a CAD program called Alibre to create the custom nozzle object, and then printed it on a Rostock Max V2 3D Printer. We have also shared the 3D file for this custom 3D nozzle on thingverse.

    • Self Aligning Fin Brackets

      We put our new 3D Printer to use making our fin brackets, but there's no reason something similar could not be made from scratch using fiberglass, plastic, wood, etc. The 3D Printer just makes producing a lot of brackets as easy as pressing a button, walking away, and coming back later to collect the parts. Using this technology also allows us to configure the printer to print the brackets as hollow shapes, meaning that they are very lightweight.

    • Star Wars Droid

      U.S. Water Rockets is proud to release this nearly ΒΌ Scale accurate droid replica for 3D printing. This replica robot from the Star Wars Universe was designed to be the most detailed and accurate 3D Printable Astromech droid you can print, with exceptional detail lacking in other printable models.

    • Universal Fin Can

      U.S. Water Rockets is proud to take fin construction to the next level, by using 3D printing technology. Our initial effort resulted in a set of fins which are joined together by a cylindrical section that holds them in perfect alignment. This arrangment is commonly referred to as a "Fin Can".

  • Tips to increase performance & Altitude
    • Tips Index
    • Increase Altitude/
      Go Higher
      • Weight Reduction

        A lighter rocket will fly higher. Removing excess weight is one of the simplist ways to make your water rocket fly higher. This tip will show you how to make your water rocket, payload bay, camera, and deployment mechanism lighter.

    • Design
      Competition
      winning
      rocket

      Our team was recently asked to assist some students participating in a water rocket distance competition held by their school. We had never done any experiments in achieving maximum distance, so we were excited by the prospect of applying our experience in setting world records for altitude, as well as the chance to work with students in the STEM field.

  • LaunchPad AlTImeter
  • Manuals & Documentation
    • Manuals & Documents Index
    • Manuals
      • LaunchPad AlTImeter Manual

        Have you ever wanted to use an electronic altimeter to find out how high your rockets fly, but you have found that the commercially available altimeter products are too expensive? U.S. Water Rockets proudly presents the LaunchPad AlTImeter, a very low cost model rocketry peak recording altimeter with optional apogee detect output and servo motor control connection. With this "Do it yourself" project, you can save close to 80% or more of the cost compared to commercially available altimeter systems.

      • LaunchPad AlTImeter Firmware

        LaunchPad_AlTImeter Firmware file archive for the MSP430 Launchpad.

      • ServoChron™ Manual

        The ServoChron™ is a low cost time delayed single/dual servo controller designed for use as a parachute deployment or staging actuator mechanism for Water Rockets, or Water Rocket Propelled Vehicles. Note: this manual includes the ServoChron assembly, programming and operating manuals into one convenient file. This manual supersedes the previous revisions.

      • ServoChron™ Firmware

        ServoChron™ Firmware file archive for the MSP430 Launchpad.

    • Documents
  • Downloads
    • Downloads Index
    • LaunchPad AlTImeter™
    • MSP430 LaunchPad Drivers

      This archive contains the MSP430 Application UART driver file necessary to communicate to the UART on the MSP430 Launchpad. MSP430 projects which communicate to the PC will use this driver.

    • ServoChron™
      • ServoChron™ Manual

        The ServoChron™ is a low cost time delayed single/dual servo controller designed for use as a parachute deployment or staging actuator mechanism for Water Rockets, or Water Rocket Propelled Vehicles. Note: this manual includes the ServoChron assembly, programming and operating manuals into one convenient file. This manual supersedes the previous revisions.

    • MSP430 LaunchPad Drivers

      This archive contains the MSP430 Application UART driver file necessary to communicate to the UART on the MSP430 Launchpad. MSP430 projects which communicate to the PC will use this driver.

    • MD-80 Camera
    • 808 Keychain camera
      • Clock Set Instructions

        Instructions and examples showing how to set the clock in the 808 Car Keys Keychain Type #11 HD720P MiniDV Camera.

      • Datestamp removal

        808 Keychain camera Type #11 Firmware file disabling the timestamp feature. NOTE: This firmware works on all models.

      • Continuous Record

        Version 2 of the 808 Keychain camera Type #11 Firmware file enabling the "continuous recording" feature. This firmware adds the following: a) The camera will not split recordings into 20 minute clips, it breaks recordings up into 4GB segments instead. b) The timestamp is disabled. c) If the battery dies, the last clip is properly saved. NOTE: This firmware works on all models.

    • Downloadable Photo Screensavers

      U.S. Water Rockets has just announced a newly created photo documentary journaling their Experimental Water Rocket Launches in the form of a Microsoft Windows Compatible Screensaver for all PCs. The new screensaver details many of their flights and contains their world famous Fall Foliage Aerial Photos, which were shot in the peak of the leaf season in northern New York State. These Screeensavers are simply loaded with breathtaking views from high altitudes, and ground camera footage from dozens of launches that kids young, old and young at heart will enjoy.

  • Water Rocket Resources
  • About USWR
  • Search
Member of the The Water Rocket Achievement World Record Association   Member since 2003

How to Build and use a 3D Camera Rig for Stereoscopic 3D Videos and Photos.

Introduction:

A few years ago, when 3D Television Sets were being promoted as the next great technology advance, we thought it would be fun to have a camera for taking video of our Water Rocket launches and experiments in Stereoscopic 3D. In the past, we had seen a few amateur rocketry hobbyists who had some basic 3D photos available, but we wanted to improve on what others had done by making 3D versions of the kind of enhanced Water Rocket videos (High Definition, Slow Motion, etc.) we specialize in.
At that time, basic ordinary video cameras capable of shooting 3D were quite costly (and they never came down in price since 3D never caught on in a big way). Therefore, we decided the only way to accomplish what we wanted was to build a 3D Camera Rig that would allow us to use our specialized cameras to achieve the goal. The way to accomplished this is to somehow use two similar cameras in tandem to capture photos and videos for each eye, and then merge them in software to create 3D output.
The result of this effort is our 3D Camera Rig, which we have created this tutorial about. With this rig, anyone can inexpensively capture 3D video and photos. All you need is a pair of 3D Glasses, and you can see the results of our design down below. Note: The cheap looking flat paper 3D Glasses actually work better than the fancy molded plastic ones. We found that the molded color filters were poor compared to the flat film filters in the paper glasses.

Part 1: How to make the 3D Camera Rig:

Step 1: Picking the Cameras:

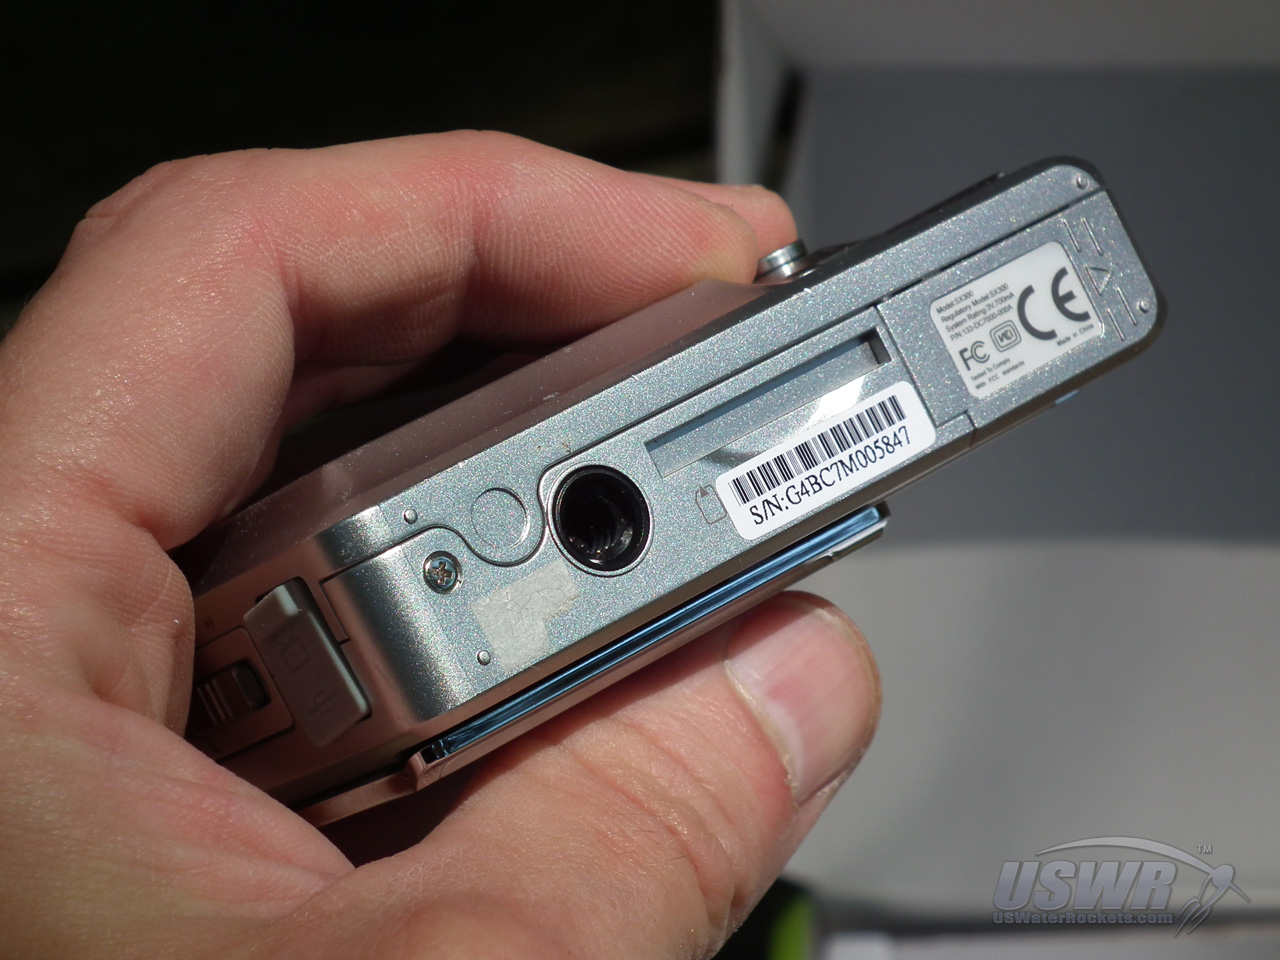
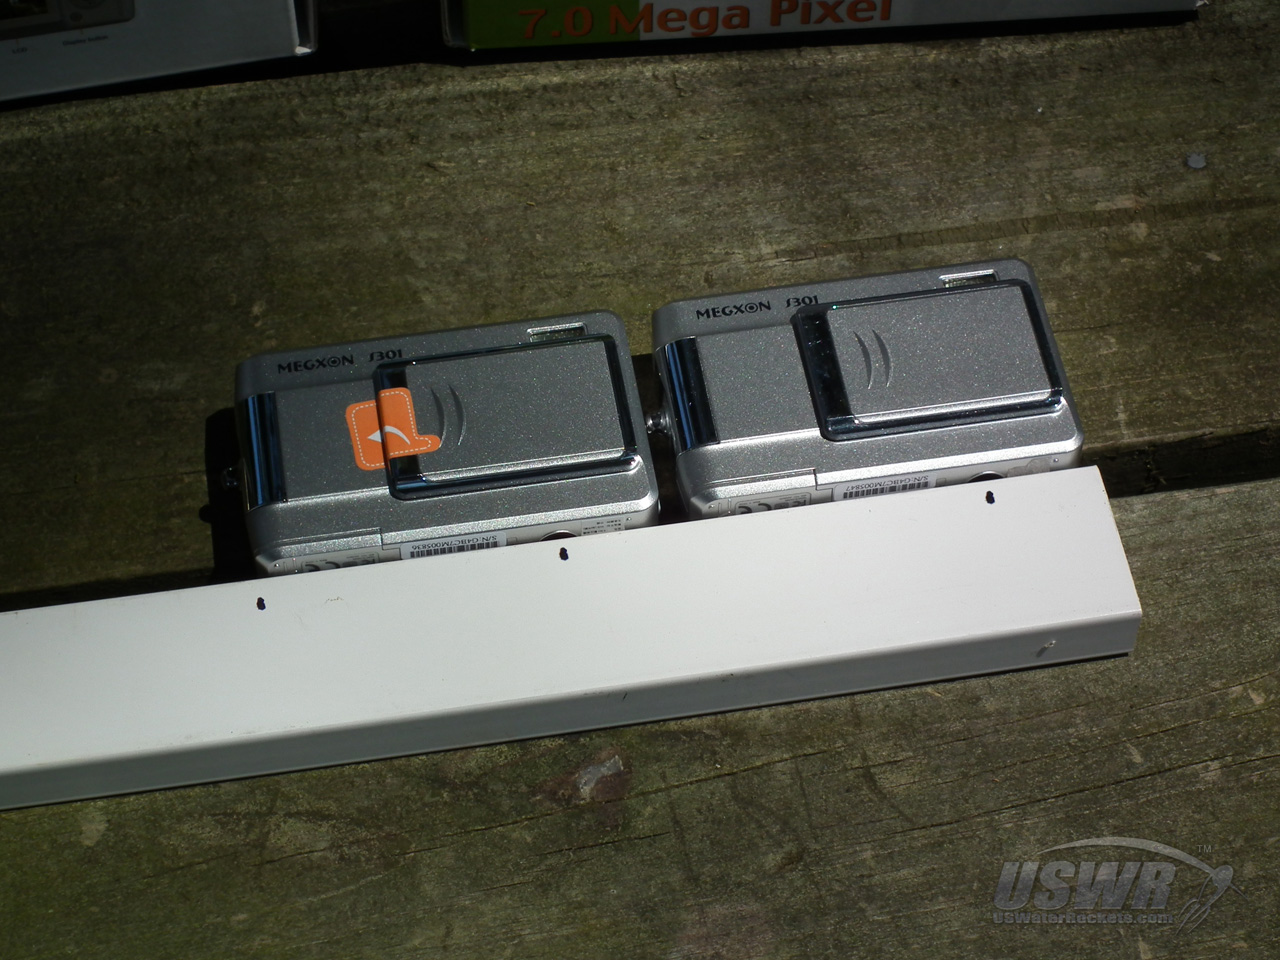
To make your own 3D camera rig, you will need to find a pair of identical cameras, and they should both have a standard threaded tripod mount on the bottom. Make sure the cameras are small enough that you can place the cameras side-by-side and the lenses will be between 2.5" and 3" apart, to simulate the distance between human eyes. If the cameras are much closer together or further apart, then the 3D effect may be too little or extreme and hard for people to view. If the cameras are different models, the differences in resolution or lenses can make it impossible to merge the output later. If you are highly skilled you may be able to match the output of different cameras by using post processing software, but that is beyond the scope of this tutorial.

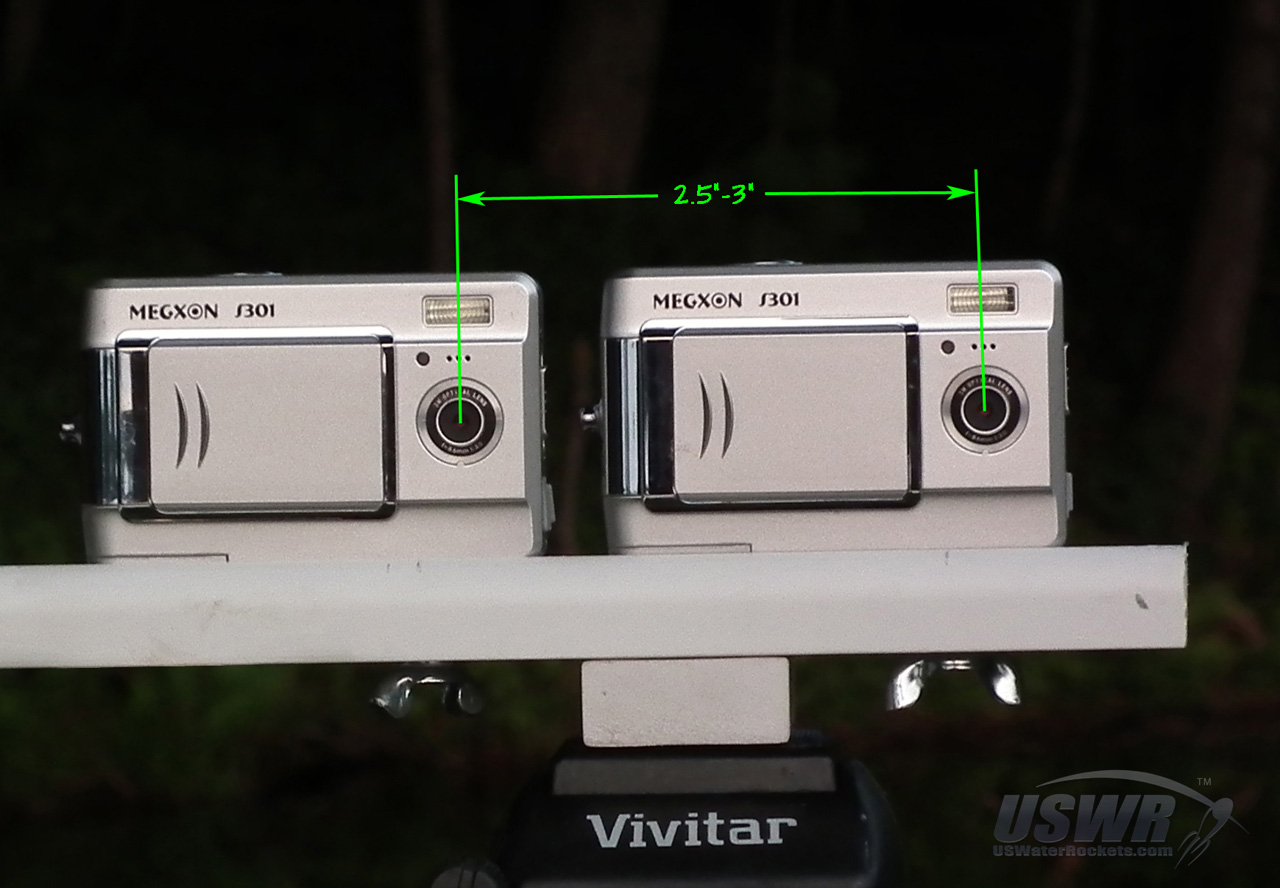
Step 2: Picking Materials for the Camera Platform:

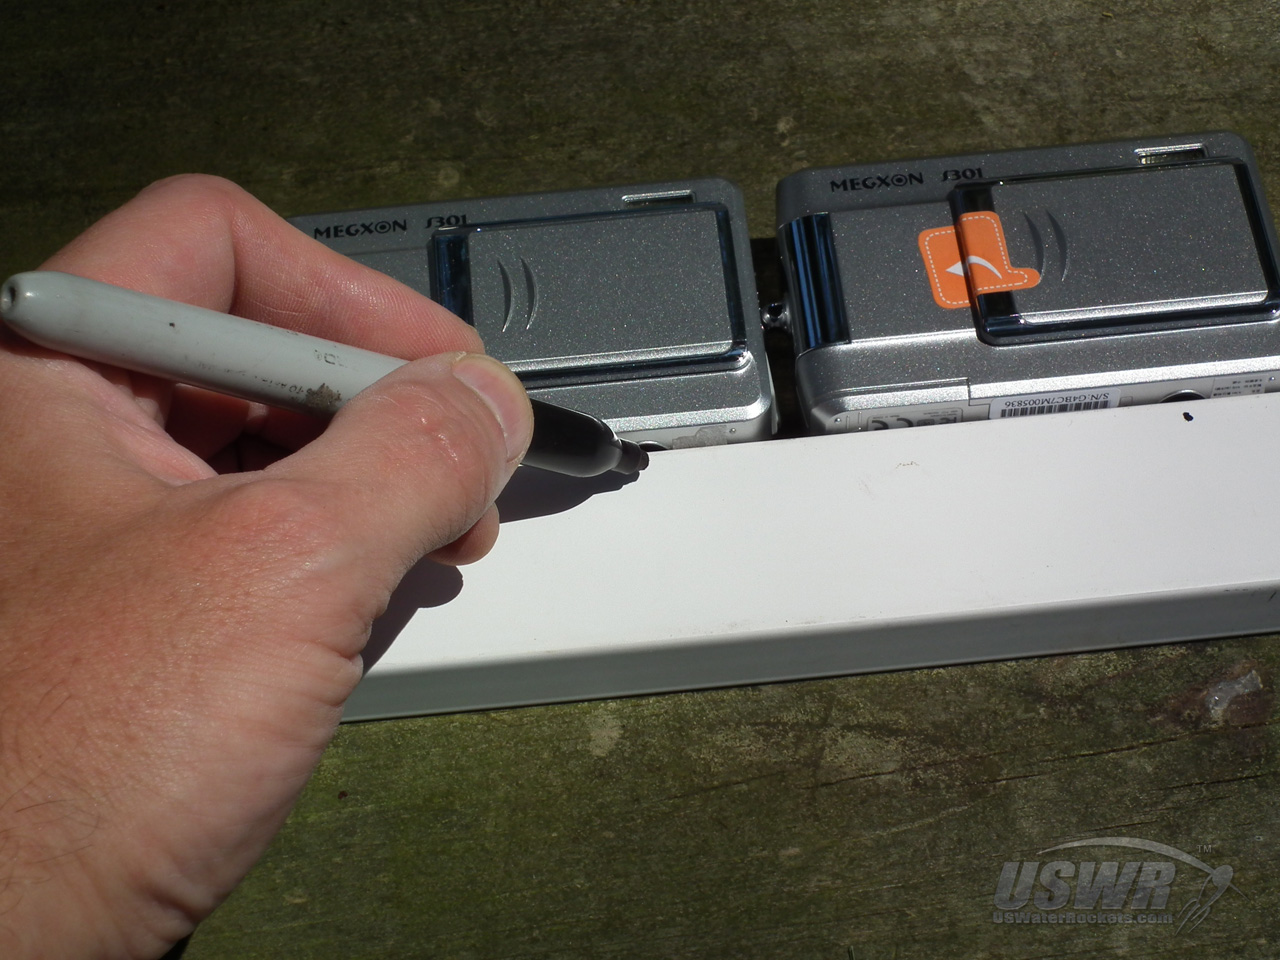
Find a piece of 1/2" thick board about a foot in length, and another piece 3/4" thick. Note: The other dimensions are not very critical. The two pieces will be glued together to form an "L" shaped platform that will hold the two cameras in parallel. Place the two cameras side by side on the bottom board and space the lenses 2.5in to 3in apart. You can now mark the board there the tripod mounts on the bottom of the cameras line up, and also the outer edges can be marked so the board can be trimmed to length.

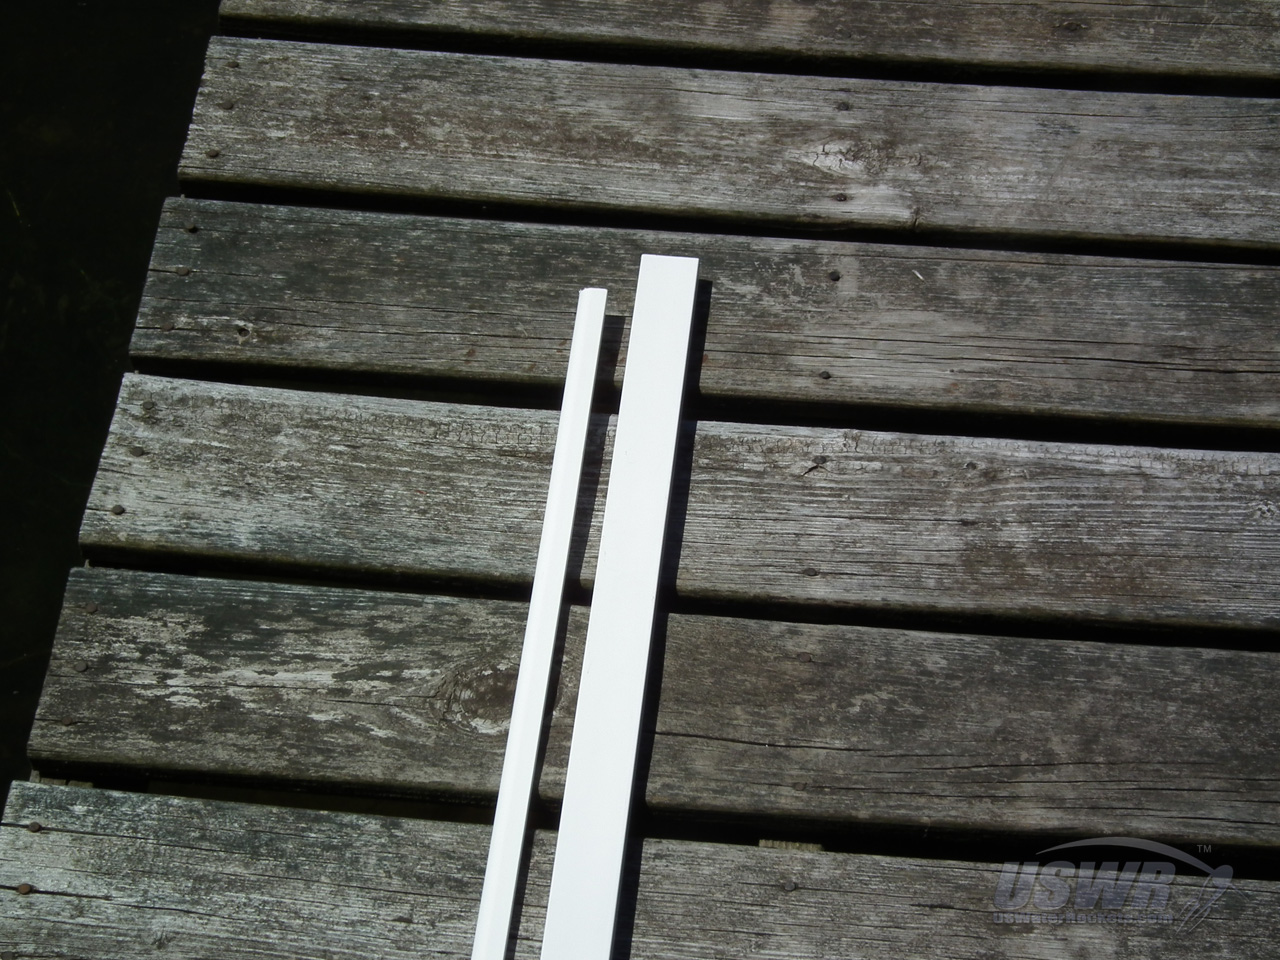
Step 3: Making the Platform:

Cut the two boards to length and then use glue to bond them together into the "L" shape for the Camera Platform. Use clamps or heavy weights to hold the pieces tightly together until the glue has cured.

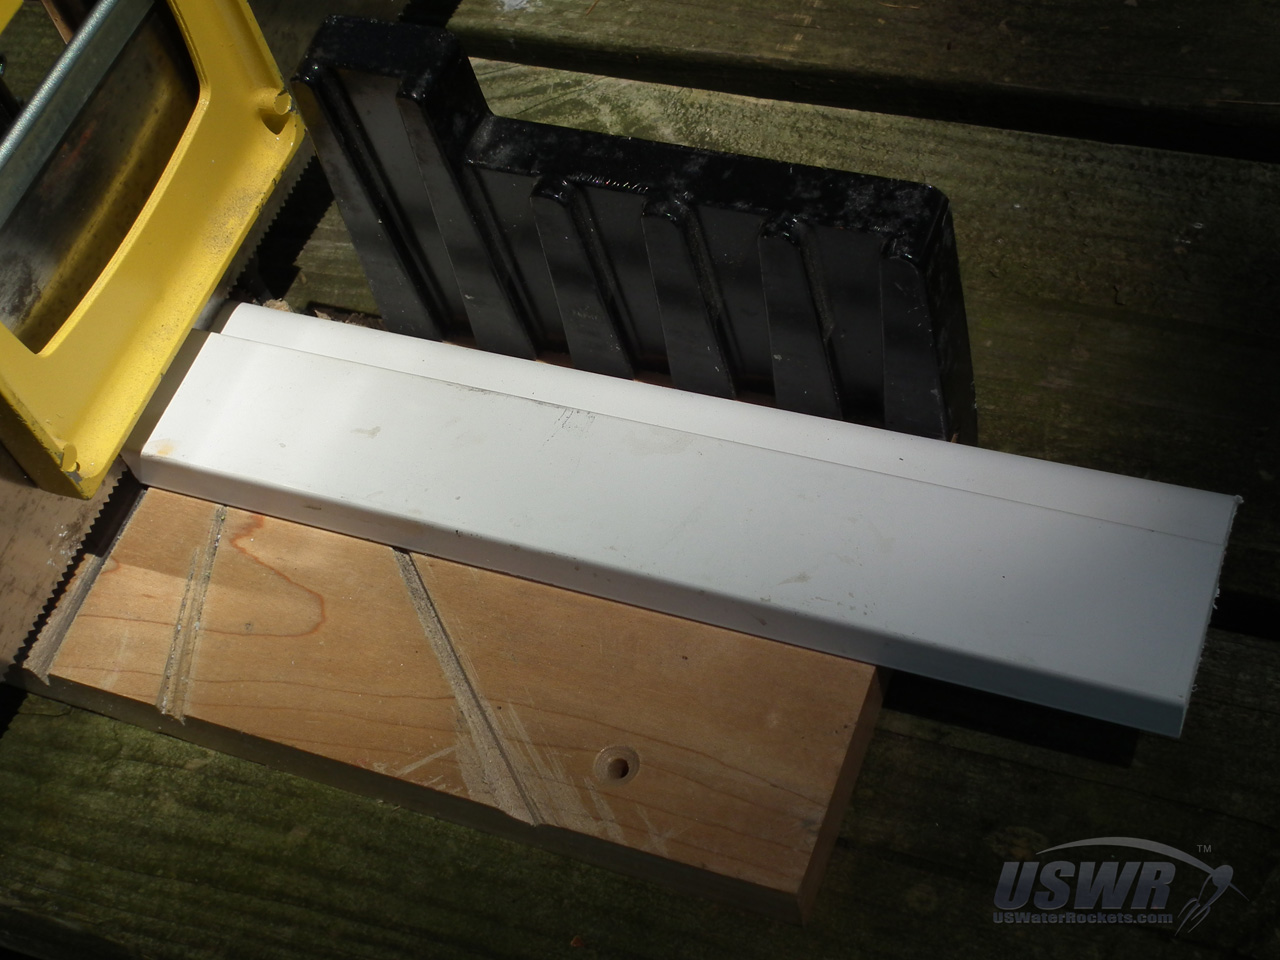
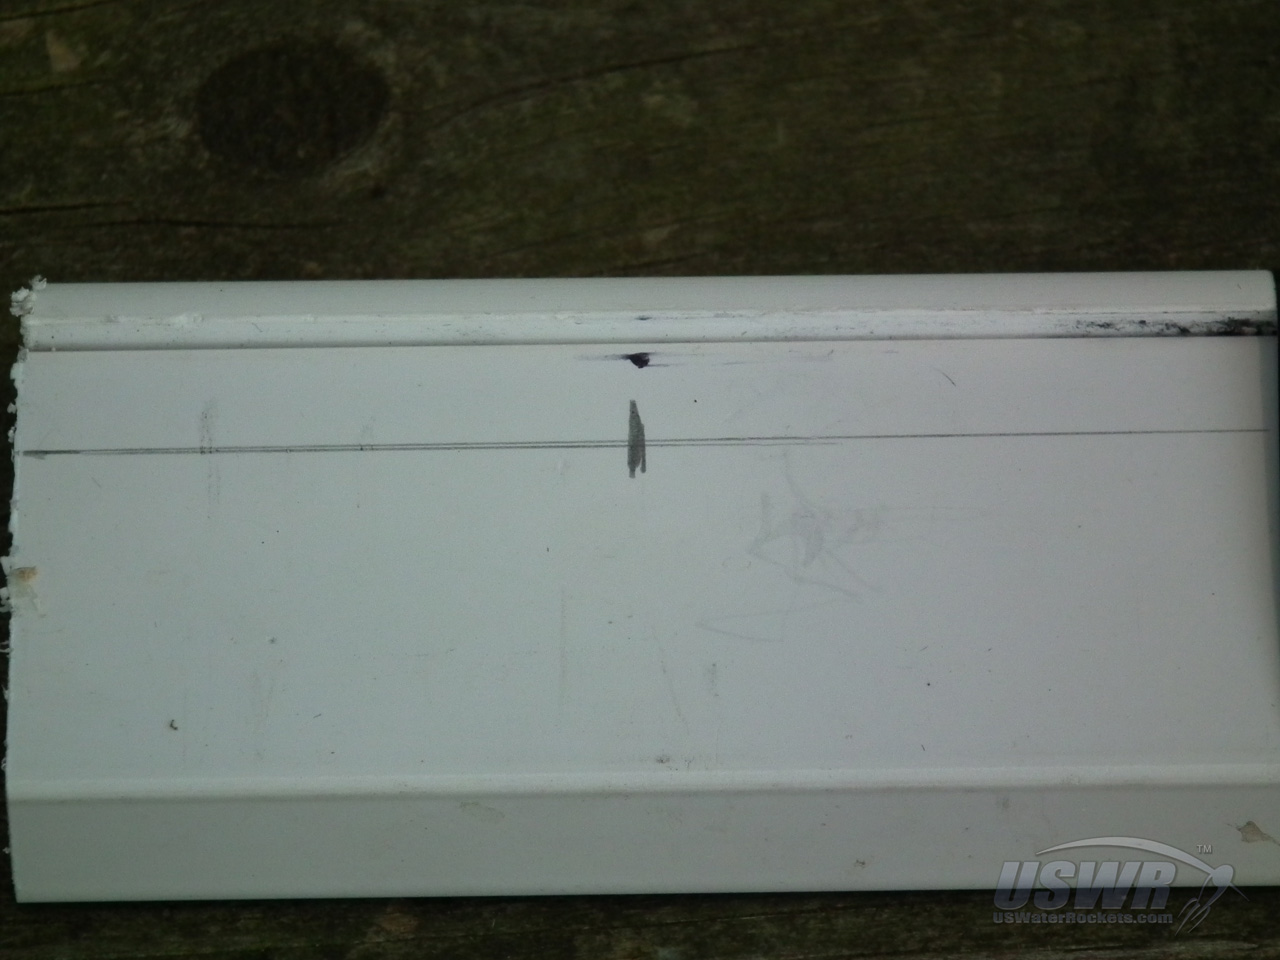
Step 4: Mark the Camera Mounts:

Hold one of the cameras in place against the corner of the "L" and mark the end of the board where the center of the tripod mount lines up. Extend the line with a straight edge along the length of the Camera Platform, then mark the places where this line intersects the markings you made in Step 2 locating the tripod mount holes.

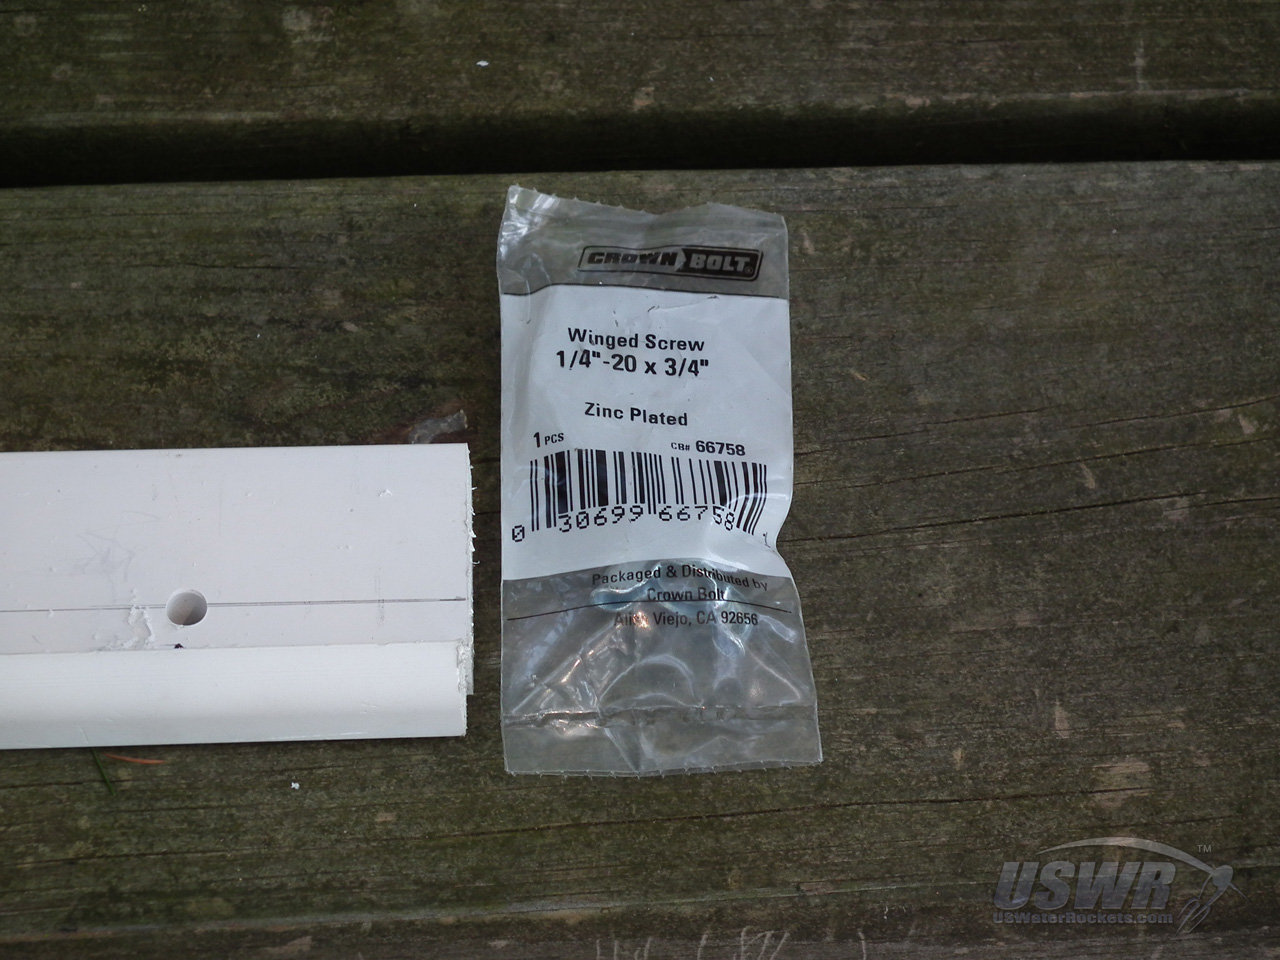
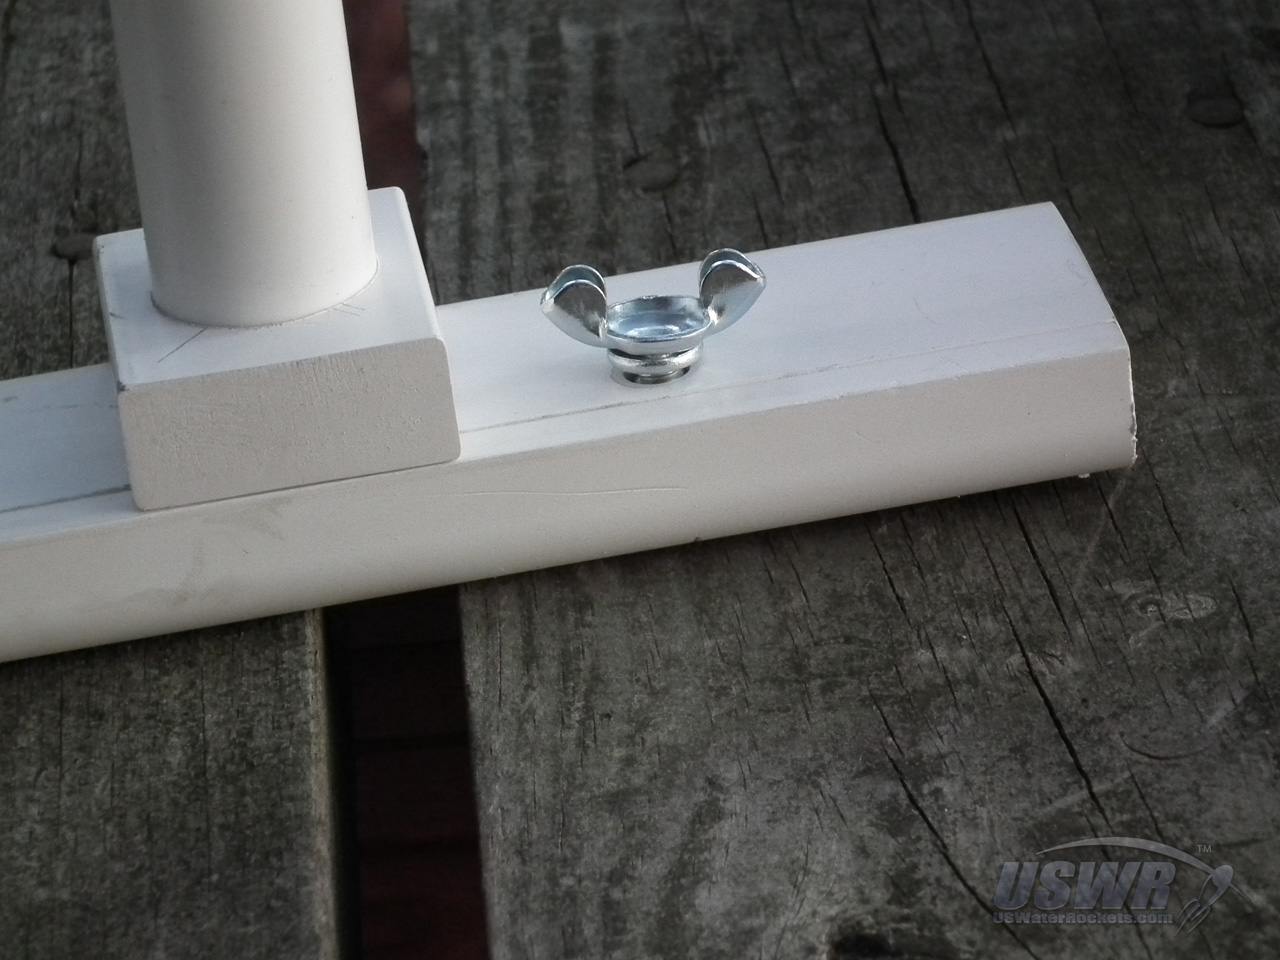
Step 5: Mount the Cameras:

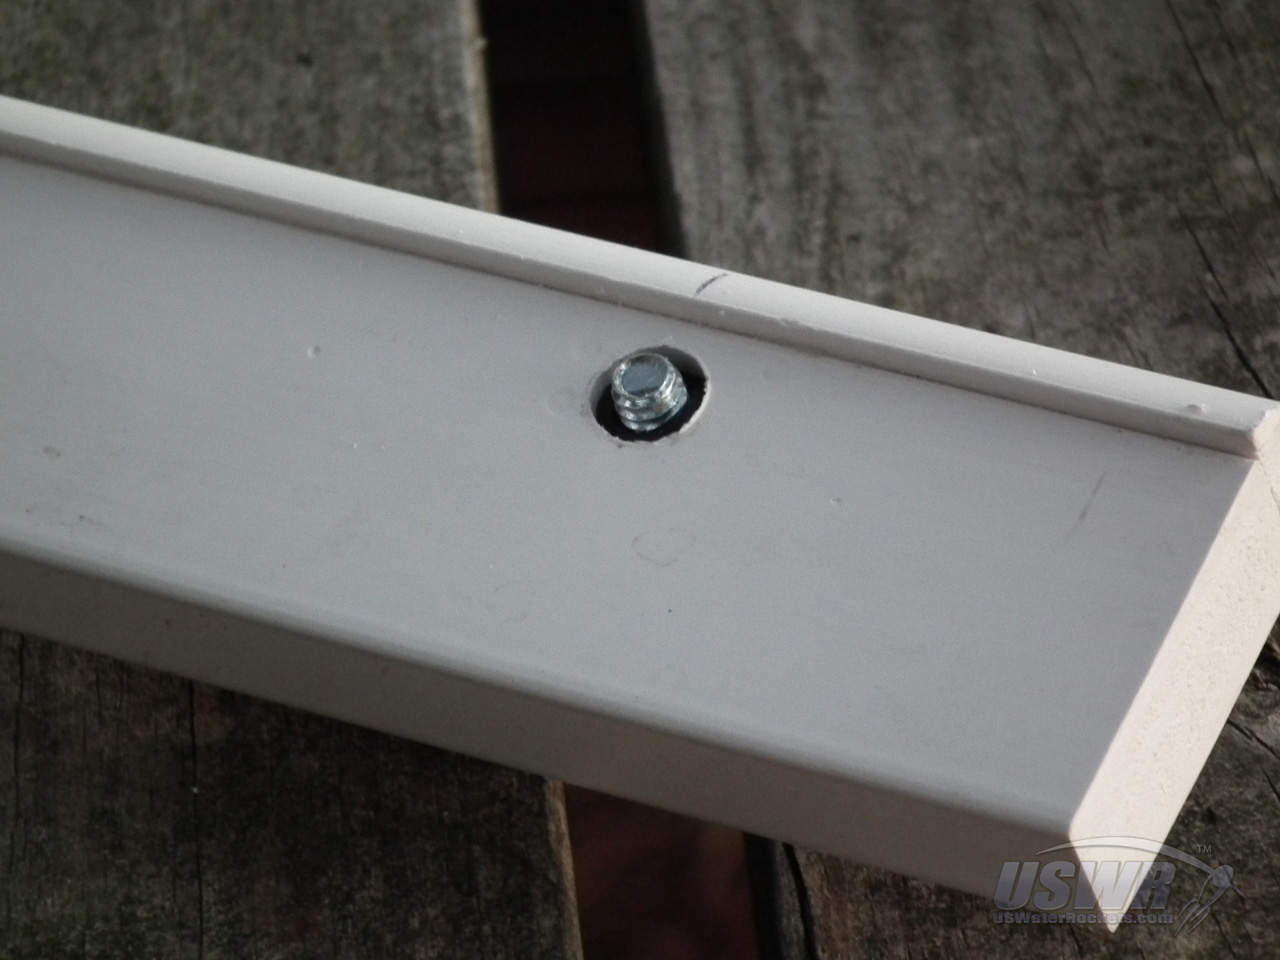
Drill out the two tripod mount holes with a 1/4" Drill bit, and insert a 1/4"x20x3/4" Winged Screw through each hole. Winged Screws are recommended because you can tighten and loosen them without needing tools, but you can use hex head or other screws if you prefer. Just remember to always carry the right tool to tighten and loosen the screws with you when you use the 3D camera rig.

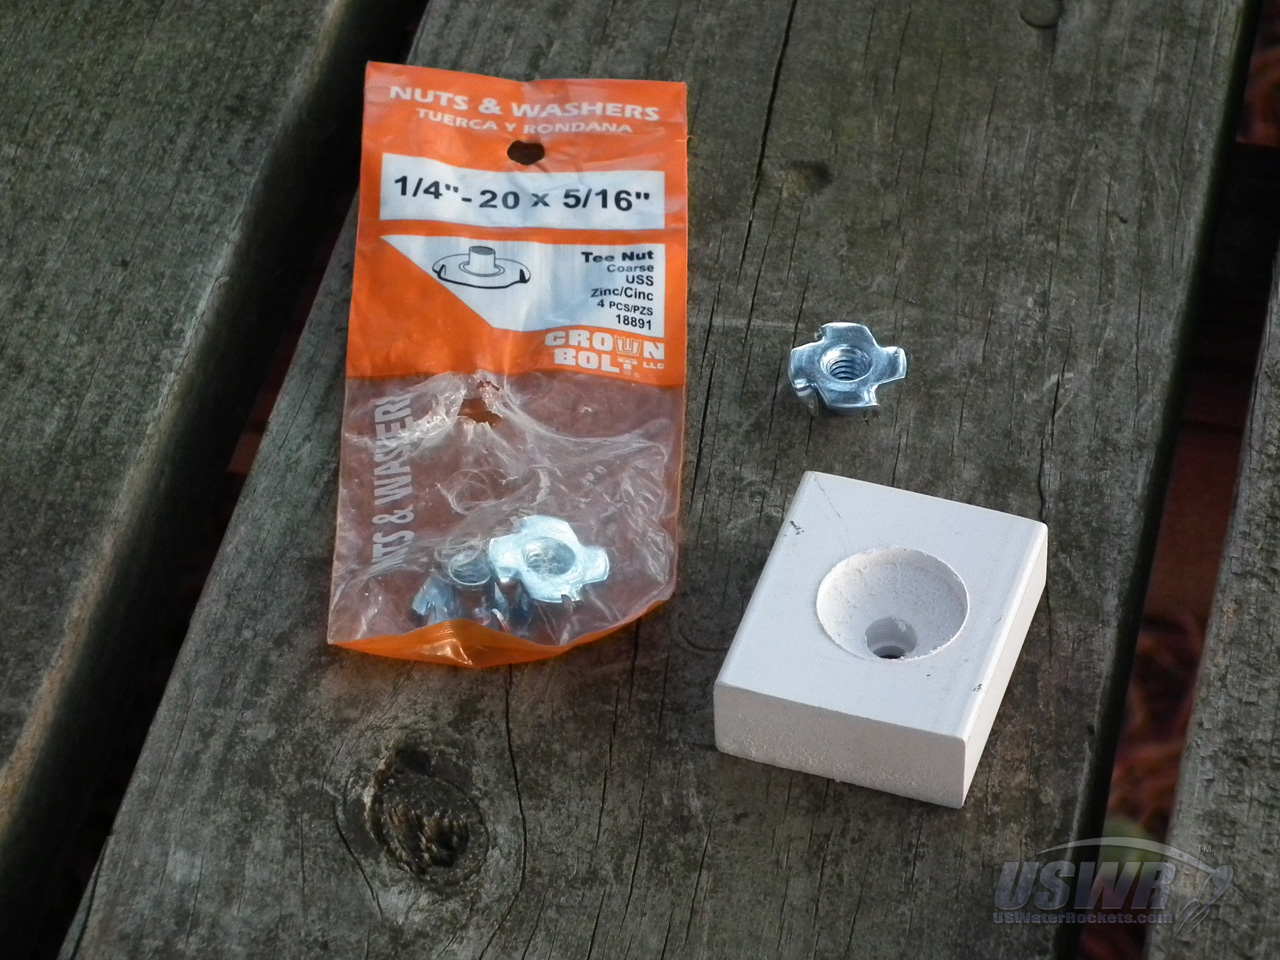
Step 6: (Optional) Adding a Tripod Mount:

If you want to use the 3D Camera Rig on top of a tripod, you will need to add a female threaded tripod mount on the bottom of the Camera Platform. We made one by taking a scrap of then glued to the bottom of the platform. Before gluing it into place, we discovered we needed to add a counter-sink hole to recess the T-Nut flange, and also a second hole partially drilled into the bottom to accept the guide pin found on some of our tripods.

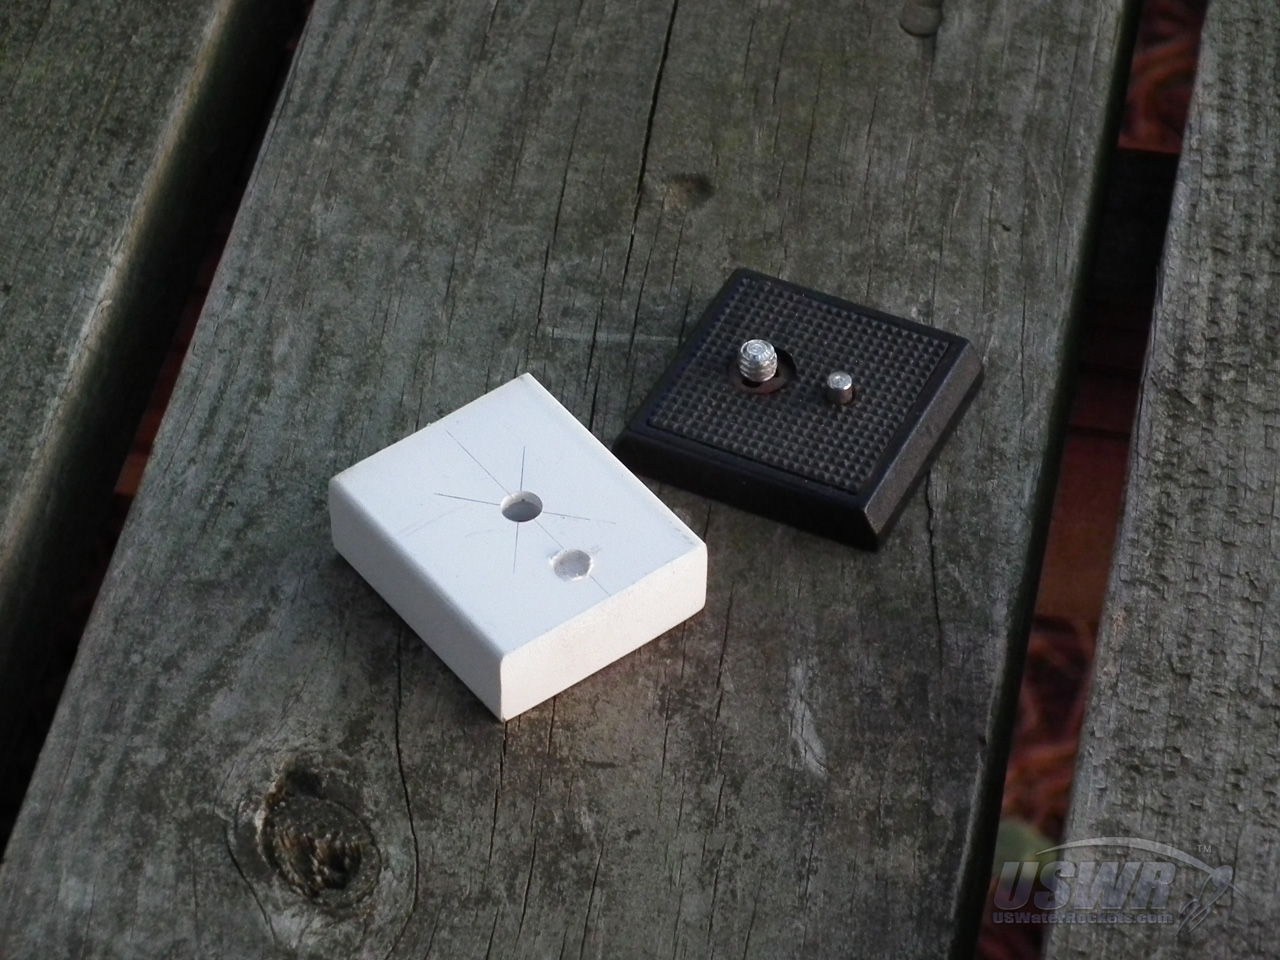
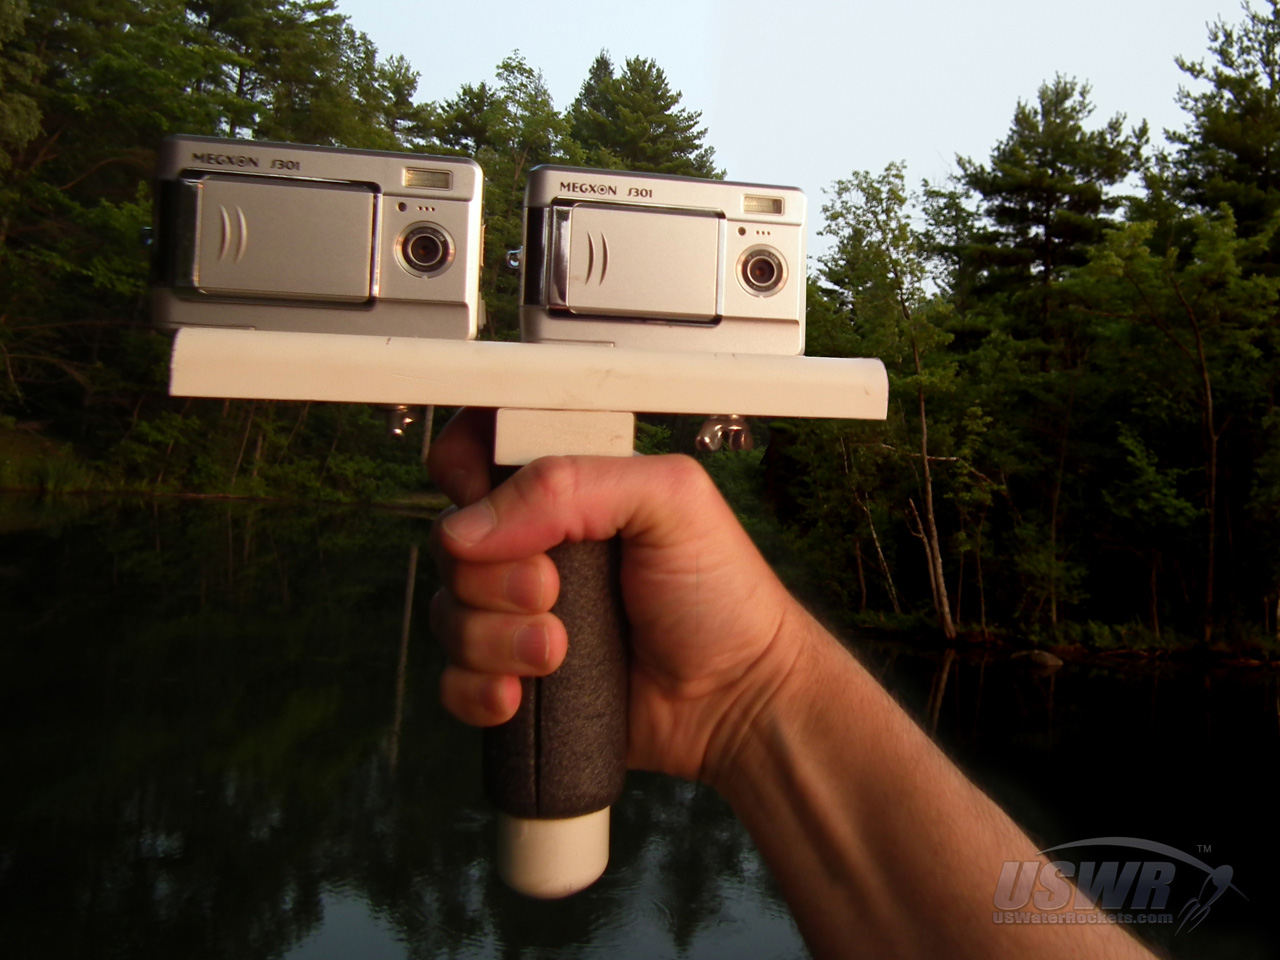
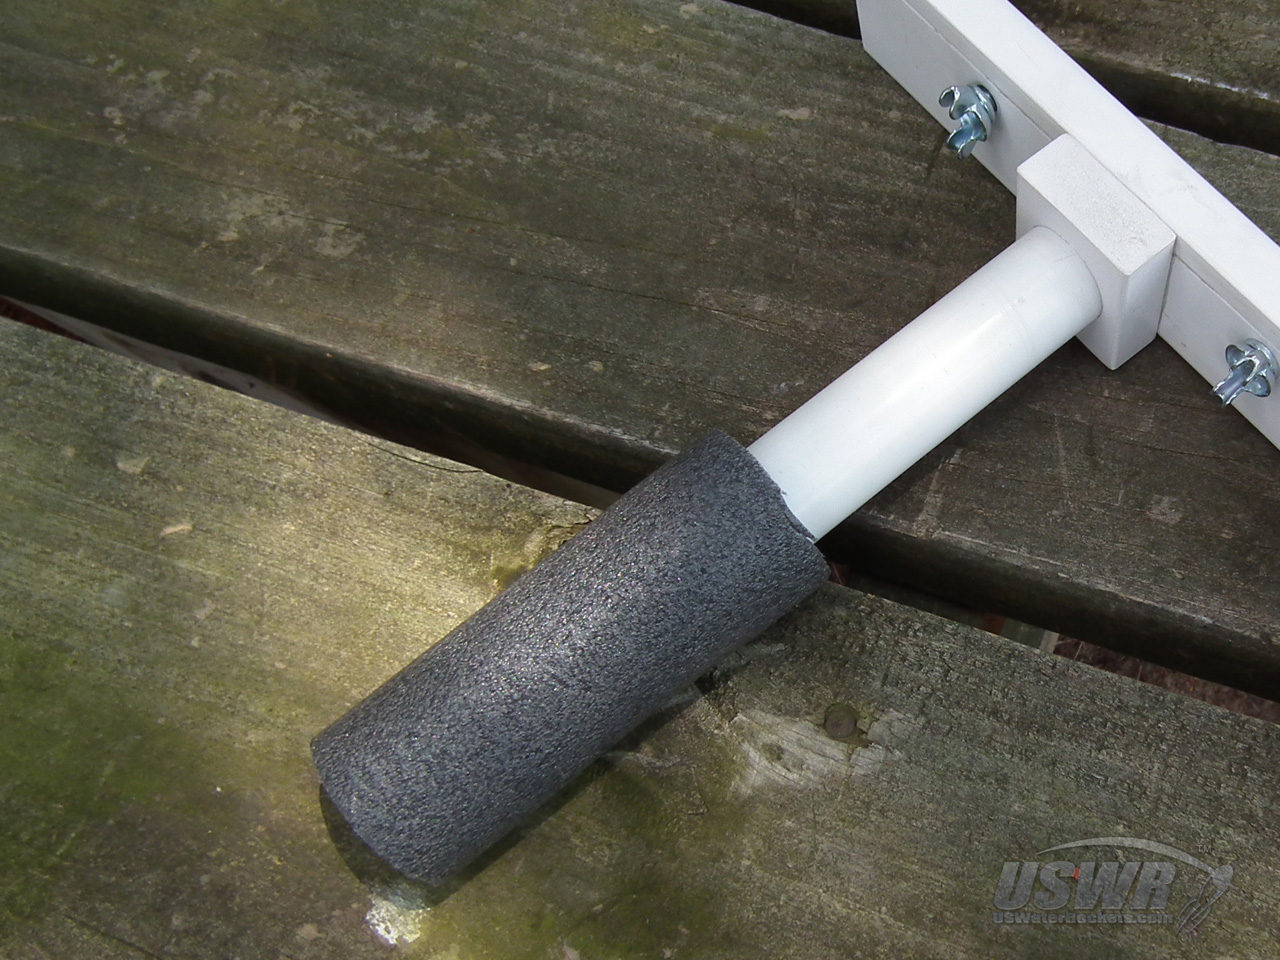
Step 7: (Optional) Adding a hand Grip:

You can also add a hand grip to the bottom of the 3D Camera Rig. To make ours, we cut a piece of 3/4" PVC pipe about 6 inches long and found a cap for the open end. A small piece of the same material used for the platform was cut and a 1" hole was drilled through to make a bracket for the handle. The handle was then assembled together, and glued to the bottom of the platform. If you want, you can add a scrap of foam pipe insulation to the handle to make a soft grip.

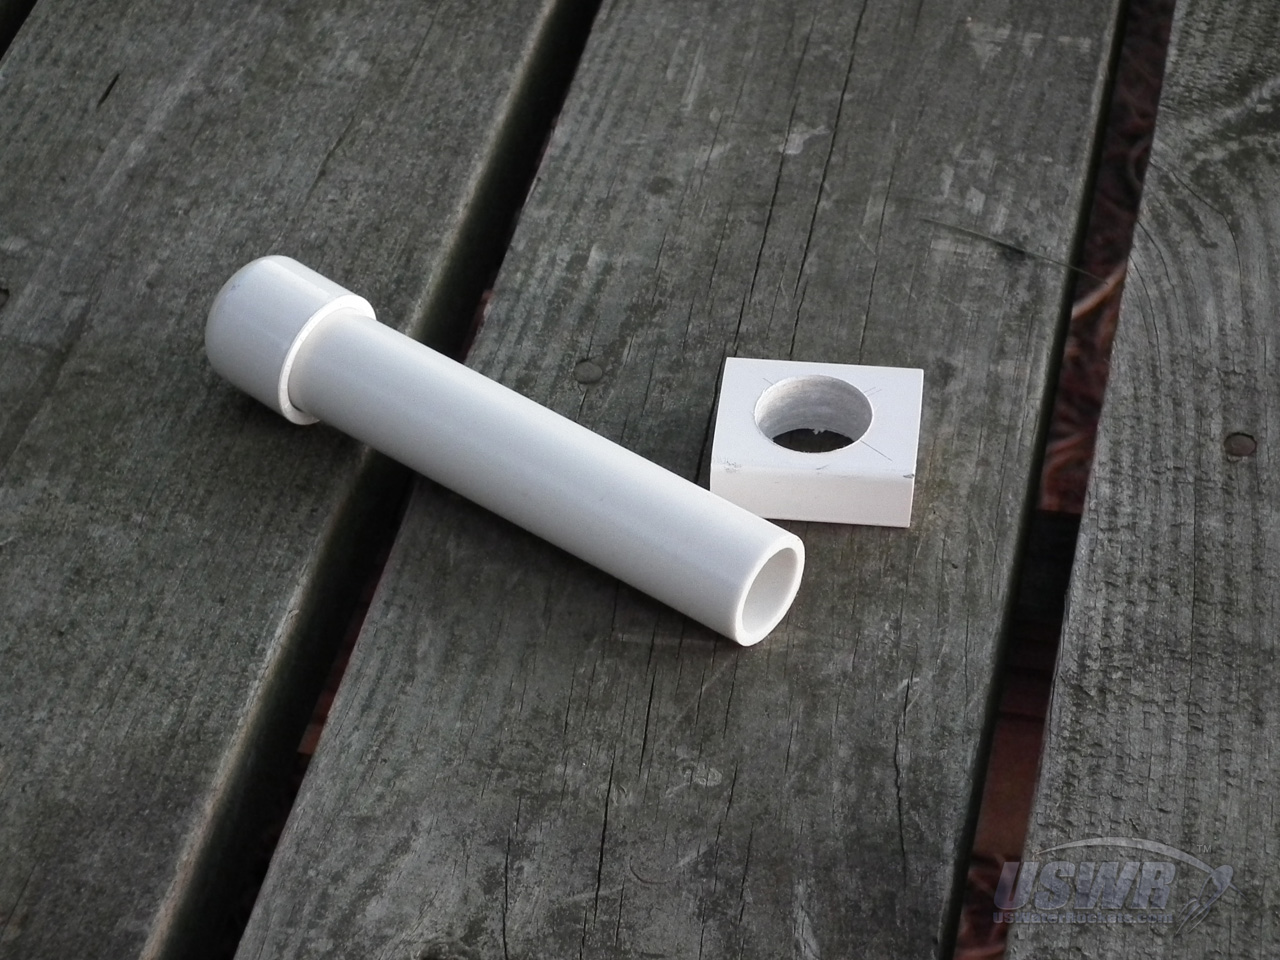
Step 8: (Optional) Capturing the Winged Screws:

One nice enhancement you can add to the 3D Camera Rig is to make the Winged Screws "Captive", which is a term that means that they don't fall out when the cameras are not 1/8" deep in the side of the screw hole opposite the winged screw head. We then slip a 3/8" diameter O-ring into the counter-sink hole and push the Winged Screw through the other side. The rubber O-ring puts friction on the Winged Screw so that it will not fall back out of the hole, but they are still free to move and operate as normal.
[Back to Table of Contents]

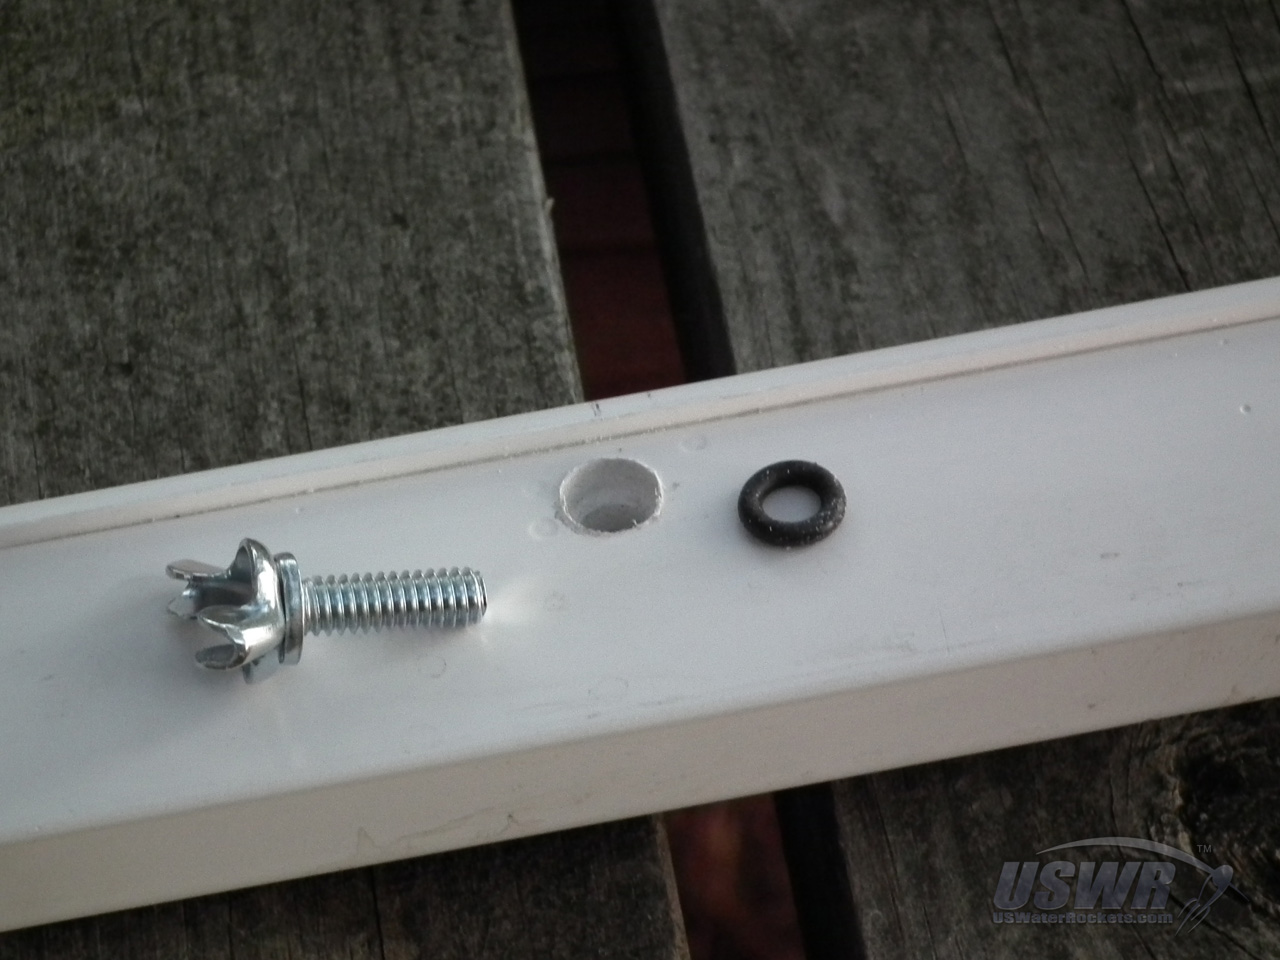
Part 2: How to use the 3D Camera Rig for Still Photographs

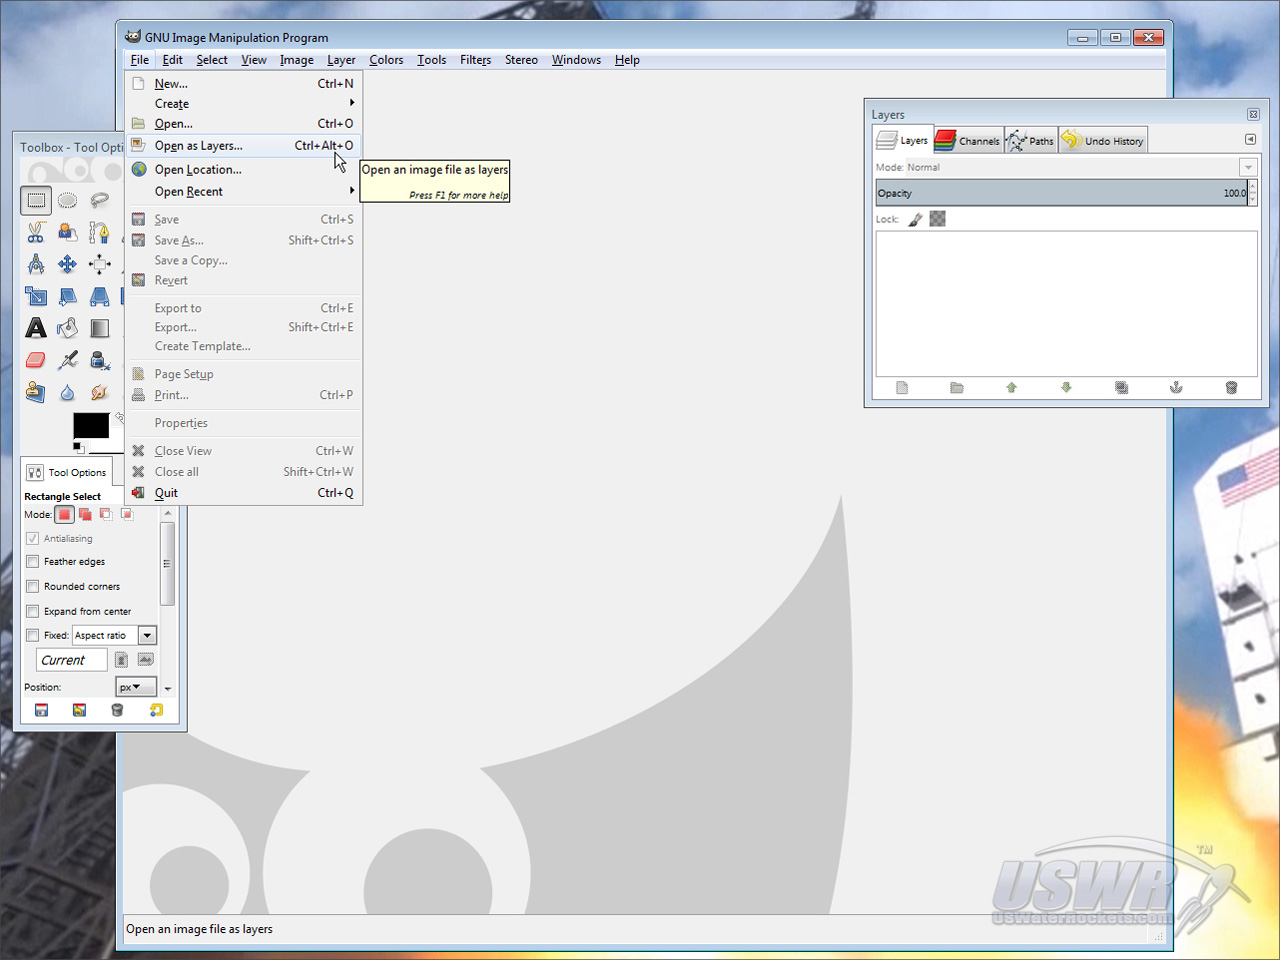
To make a 3D Anaglyph Still Image, you will mount the two cameras on the 3D Camera Rig, point at your subject, and press both shutter buttons on the cameras at the same time. Each time you do this, the right and left cameras will take an image from slightly different perspective. The left and Right images must be combined to produce a single 3D image, called an "Anaglyph", which you can view on your computer.
We found a free and easy way to make Anaglyphs. You will use an Open-Source Image Editor called "GIMP", which is essentially a free clone of Adobe Photoshop. You can download GIMP at http://www.gimp.org. You will also need a plug-in script called "make-anaglyph", which can be downloaded at http://registry.gimp.org/node/6527. You will then need to install the plug-in by moving it to the GIMP scripts folder which you can locate by checking the GIMP menu item Edit>Preferences>Folders>Scripts. Once copied there, click on Filters>Script-Fu>Refresh Scripts.
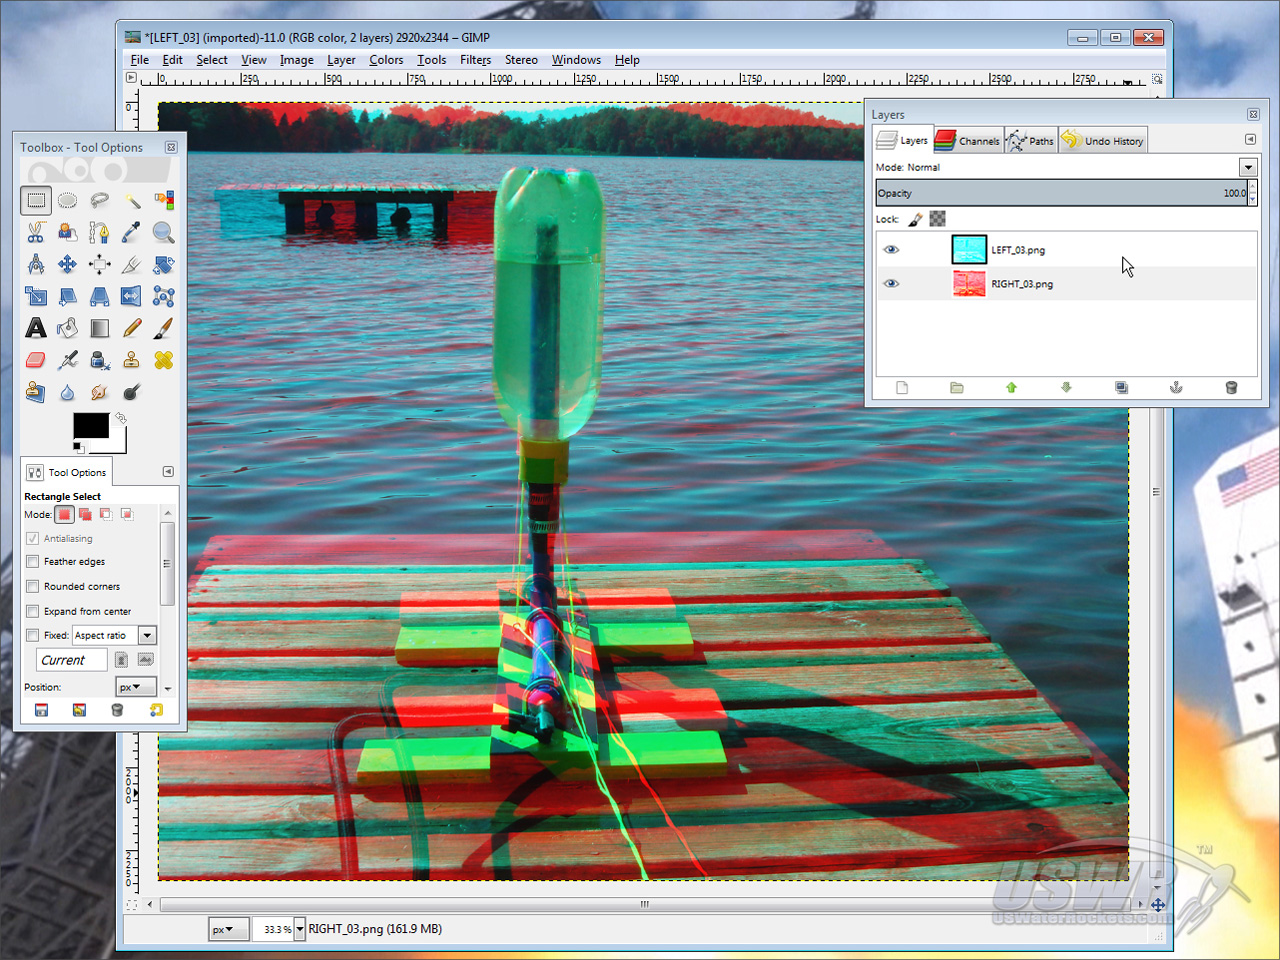
In order to make use of this script you will first need to load a pair of images taken with the 3D Camera Rig as different layers in the same image window in GIMP with the right for Red/Blue 3D glasses. If you experiment with 3D glasses with different color filters in them, you can make adjustments to the color settings and then click "OK" to make the Anaglyph.
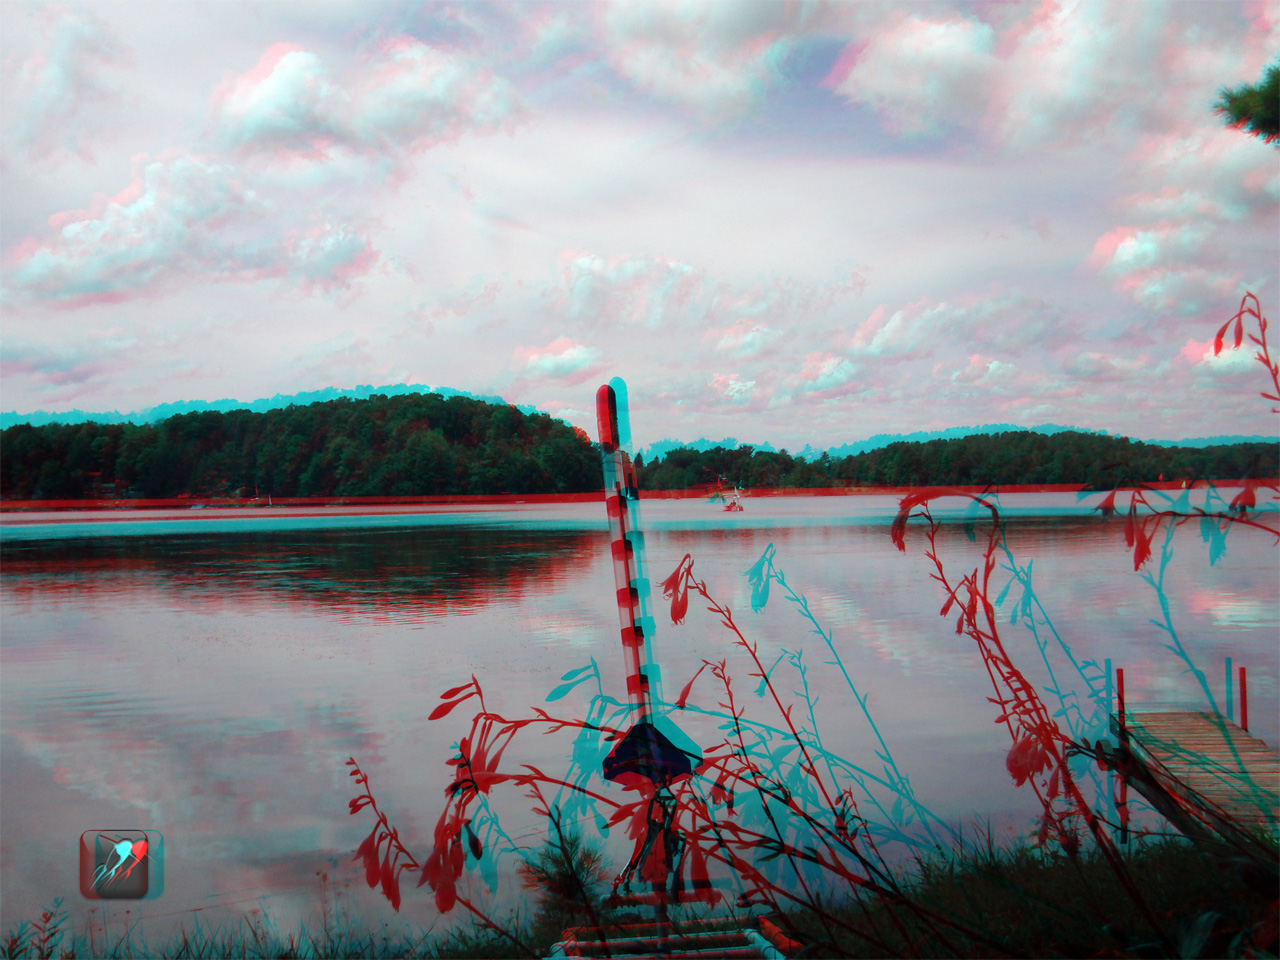
[Back to Table of Contents]

Sample 3D Photos

Sample 3D Photos:

Check out the 3D Still Photos we were able to create using the 3D Camera Rig and the method described in this tutorial. We're pleased with the results, and will definitely be using this more in future projects. If you click on the photos, you can expand them to much larger versions and really enjoy the effect!
[Back to Table of Contents]

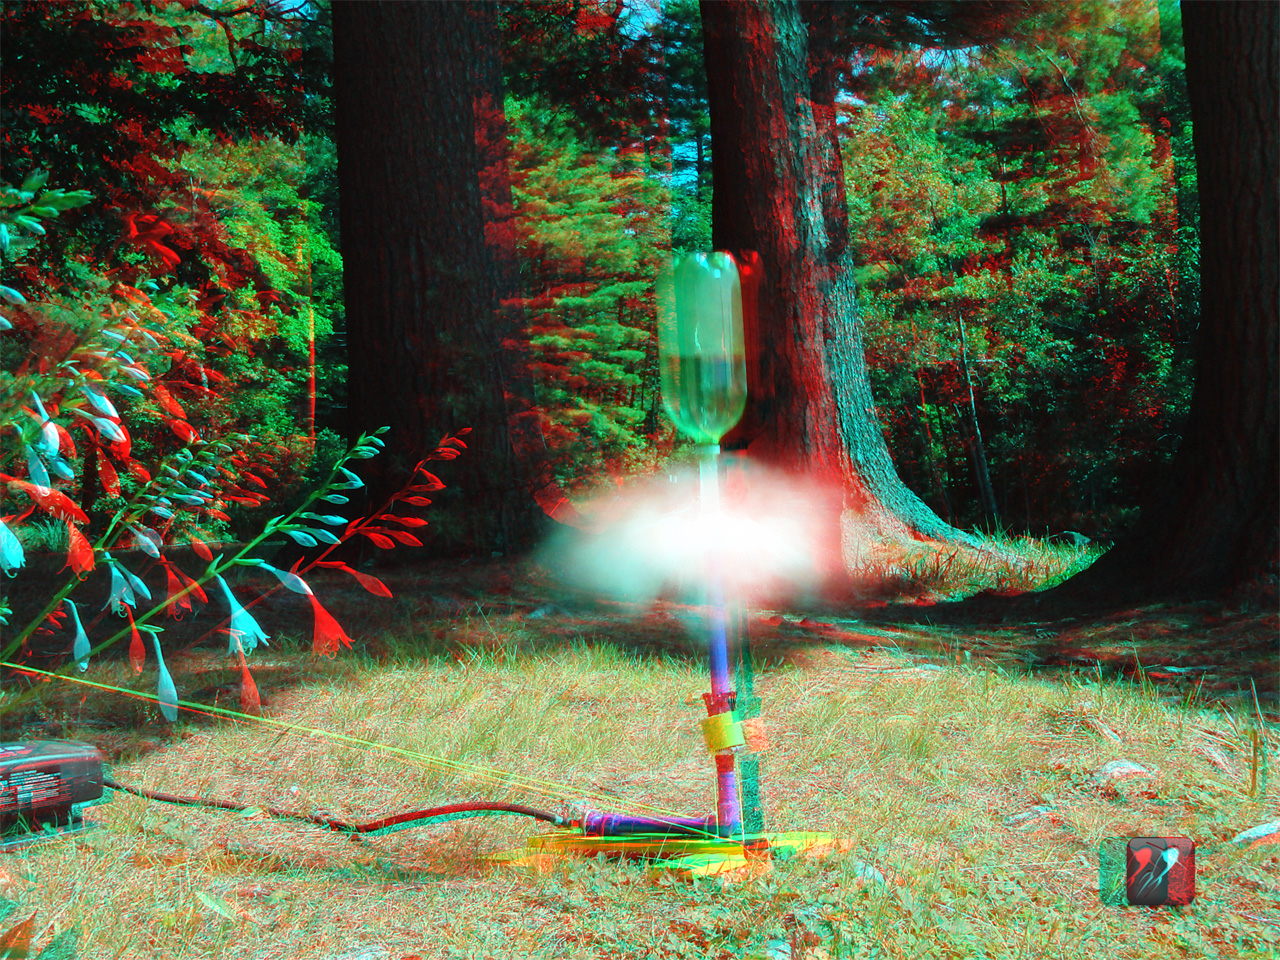
Part 3: How to make a 3D Movie using YouTube

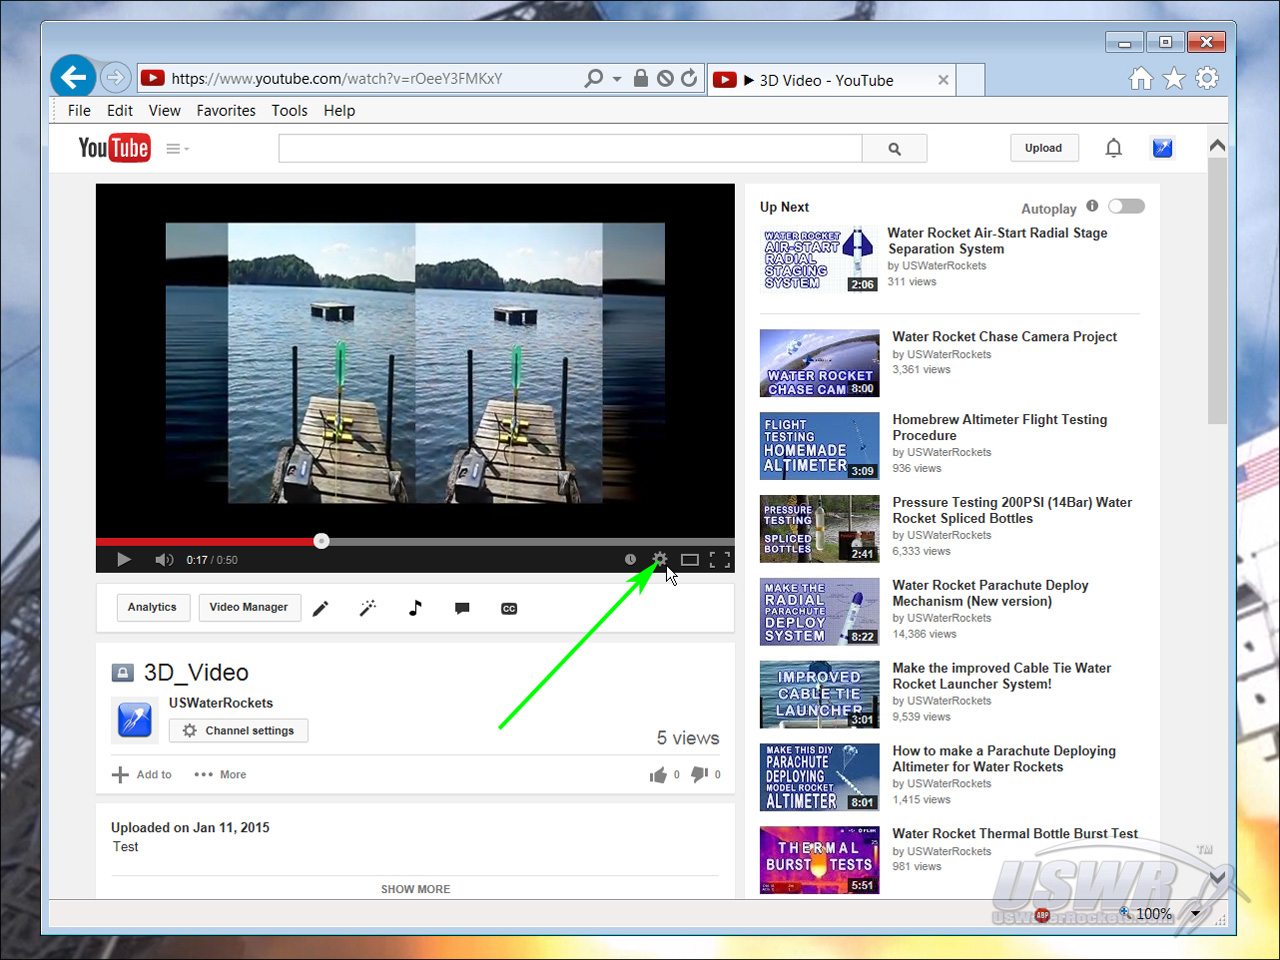
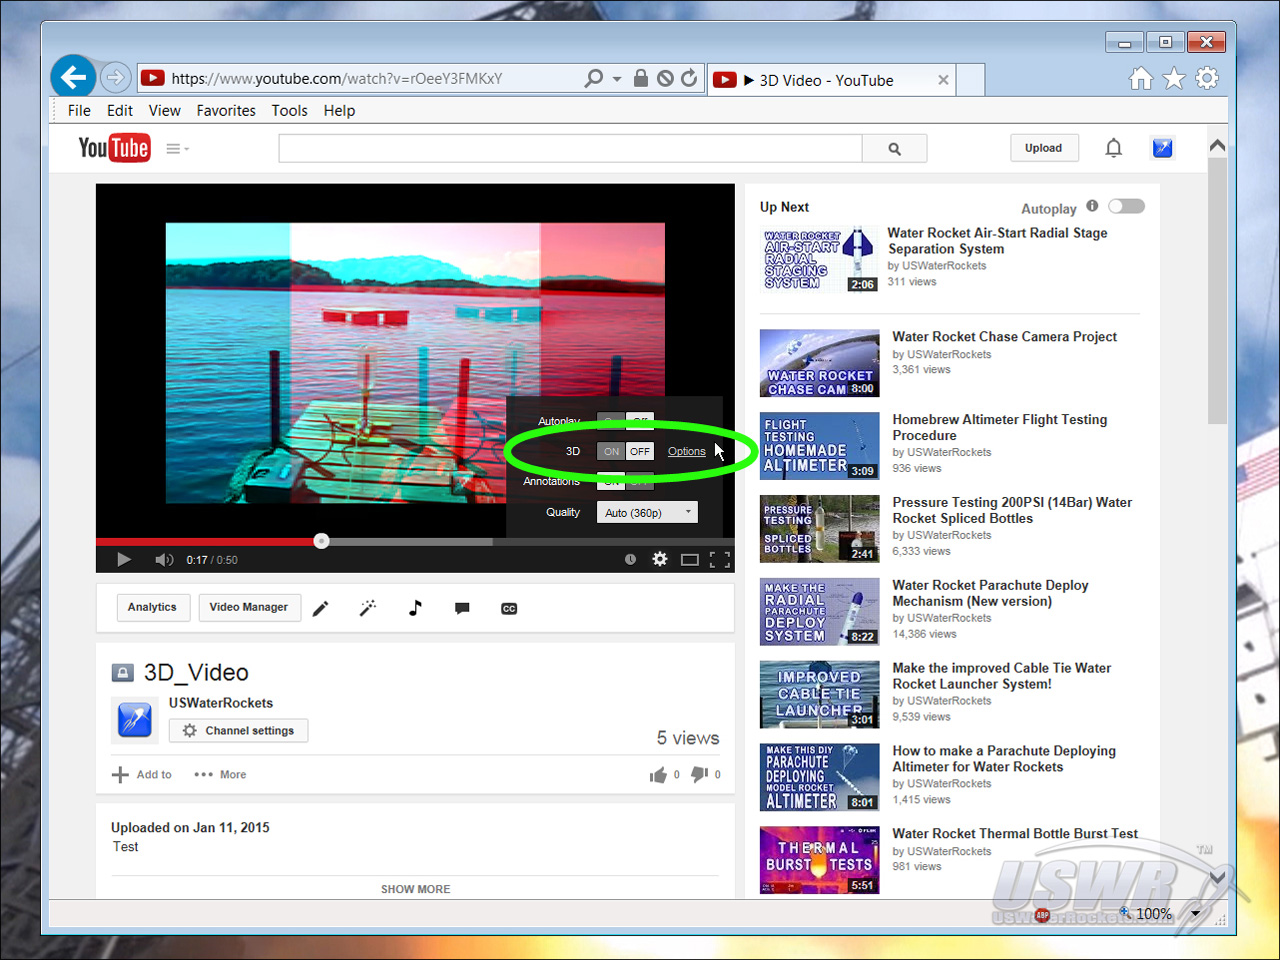
For a 3D movie, you will need to work a little bit harder. You will set up your 3D Camera Rig as usual, and press the "Record Video" buttons on both cameras simultaneously. It is a good idea to wait a few seconds and step in view of the cameras and make a sudden motion, such as clapping your hands once. This works like a Hollywood "Clapboard" used when making movies and the idea is to create a reference point in your video you can use later to make sure they are synchronized.
When done recording, you will take the left and right videos and load them into your video editing software. You must then use the software to take both videos and scale them to 50% width (keeping them 100% in height). You will end up with a tall and skinny video for each view. Open a new/blank video file (in full resolution) and place the left video on the and adjust the timeline of one or the other video until both clips are synchronized. You will now save/render the output video which is the two videos side-by-side on a single video. This file is then uploaded to YouTube. When it has uploaded go into the "Advanced" tab and pick "Please Make this Video 3D" under the 3D settings. After a few minutes of processing, the video will convert to a 3D video, and 3D options will appear in the video player settings.
That's all there is making a 3D movie. We have created a sampling of 3D videos which we have uploaded to YouTube. Check out the video below, and leave your comments and suggestions in the video comments section or on the Water Rocket Forum. [Back to Table of Contents]
Sample 3D Video (With 3D Slow Motion):
[Back to Table of Contents]
Creative Commons License How to Build and use a 3D Camera Rig for Stereoscopic 3D Videos and Photos by U.S. Water Rockets is licensed under a Creative Commons Attribution-NonCommercial 3.0 Unported License.